 So, we realized that there are several CHA layouts and projects that you haven't seen yet, including several by Jenni Bowlin! Plus we finally have booth pictures as well! We'll be going through those files and sharing them with you next week. Here is one by Doris Sander though. Pardon the wonky flags, CHA can be a little rough on a layout.
Pages
▼
Monday, February 28, 2011
Americana by Doris Sander
 So, we realized that there are several CHA layouts and projects that you haven't seen yet, including several by Jenni Bowlin! Plus we finally have booth pictures as well! We'll be going through those files and sharing them with you next week. Here is one by Doris Sander though. Pardon the wonky flags, CHA can be a little rough on a layout.
March Exclusives!

 Here's a peek at March from Michelle McCord! Plus a glimpse at some of our exclusives and vintage items in the main kit this month. We'll have more for you tonight at midnight!
  Membership does have it’s benefits. . . Beginning March 1st, JBS Mercantile will offer member’s first rights to purchase Add-On Kits as well as other special additions offered on the 1st of each month. For the first full day of the month, only members will be allowed to purchase the member-Exclusive products. On the 2nd of each month non-members will be offered any of the kits that remain. As is currently the policy, member’s will also have the option to add these items to their monthly kit shipment at little or no additional shipping charge. To make this change a little sweeter, we are also debuting an additional Add-On Kit each month – that’s two add-on options to match your kit each month, both with one-of-a-kind vintage items to boot!
 *
Note on shipping. . . In an effort to provide a more affordable shipping option for our customers, in October we switched to a brand new FedEx product called “Smart Post”. This has made as much as a $4 cost difference domestically for a standard weight box, particularly for our Central and West coast customers. As FedEx continues to work out a few of the kinks, we realize that many of you, particularly the West coast, have experience longer than normal shipping times. We do hope and expect this to be improved in the next couple of months and are watching it closely. Unfortunately, since we started this new shipping process, the weather has not cooperated, and has caused delays, even when your area may have not been directly affected. FedEx is working to enhance this product in several ways and we believe the enhancements along with the significant cost savings will be a better fit for our customers long term. This FedEx product has also allowed us to cap our domestic shipping cost to just $7.25 for any order, anywhere in the country, regardless of how much, or how heavy your order is. So fill up your shopping cart, without filling up your shipping charges!
Sunday, February 27, 2011
Winners!!

 Our sketch challenge winner and creator of this delightful layout is Jinny Newlin! Jinny writes, "I have had the idea for this layout in my head for the longest time. February and JBS brought it to fruition between my glorious kit and that fantastic sketch. Thanks!"
 Our "Get Painty" challenge winner is Jenni Hufford! Isn't this layout so sweet? I love it's homespun charm.
Congratulations Jinny and Jenni! Email me at doris.sander@gmail.com and I'll get your gift cards sent to you! Thanks for playing along with us! :)
Friday, February 25, 2011
The First Ever JBS Mercantile Online Crop!
 We cordially invite you to "Be Our Guest" at our first ever online crop which will take place next weekend on our new and improved message board complete with chat room! Please help us spread the word! It's going to be great fun with lots of quirky games, inspiring challenges, and chats with our designers. We will be giving away lots of gift cards to JBS Mercantile, plus we have two amazing top prizes! First Prize is a Guest Designer spot for the April JBS Mercantile Kit Club ($75+ value) plus a gift box of new "Be Our Guest" goodies ($75+ value). Second Prize is a Guest Star spot right here on the JBS Inspiration Blog with a gift box of new "Be Our Guest" goodies ($75+ value). You can't win if you don't play, so we hope you'll find time to "Be Our Guest" next weekend!
Thursday, February 24, 2011
Love Banner by Keisha Campbell
 Today we have a soft and feminine banner from Keisha Campbell showcasing our new wooden spools. It's so creative! and beautiful! I love it!
 Keisha writes, "A fun & quick love banner made with the new JBS spools. I simply cut some strips of paper & taped them to the spools. As soon as I saw the spools last month on the DT blog this is the idea that popped into my head! So when the box came yesterday the spools were the first thing grabbed. It was really hard not to play with the stamps first."
Wednesday, February 23, 2011
Circle Embellishments with Dabbers & Inks!
Happy Wednesday everyone! Lisa here and today I wanted to share a little project using the JBS Paint Dabbers and Ink Pads by Ranger:
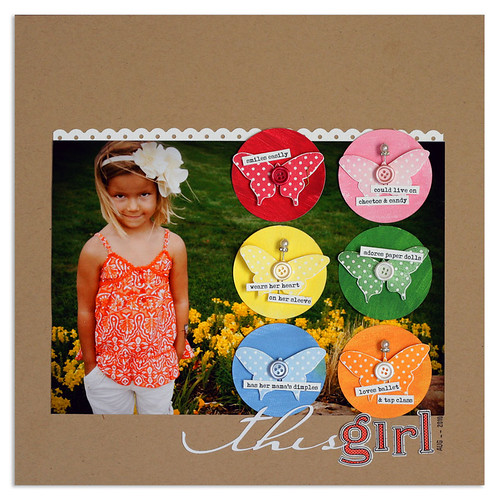
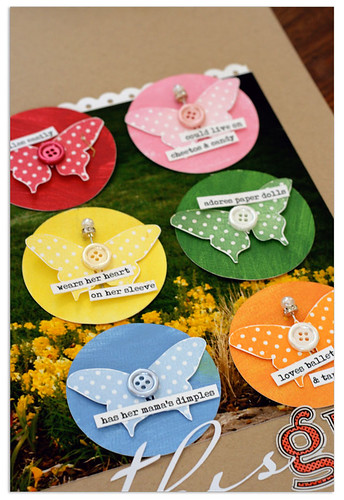
One of my favorite things about these new paints & inks is how well they coordinate across various mediums. You don't have to worry if the Soap Powder paint is going to match the Soap Powder ink - the paints and inks are wonderfully consistent in their color! On this page, I used the paint dabbers to make custom-colored cardstock circles and topped them with matching stamped butterflies:
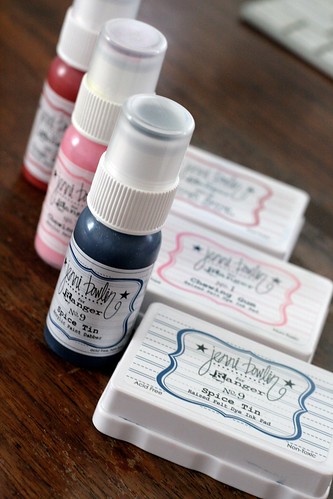
This is a simple technique to do - just grab your paint dabbers and the matching ink pads.
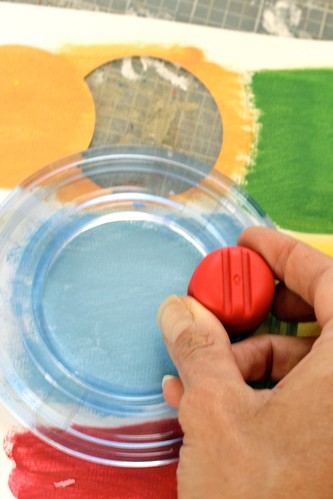
Apply the various paint dabbers to a piece of plain white cardstock:

Once the paint is dry, use a circle cutter or punch to cut out your circles:
Then use the matching stamp ink to stamp your image on white cardstock:
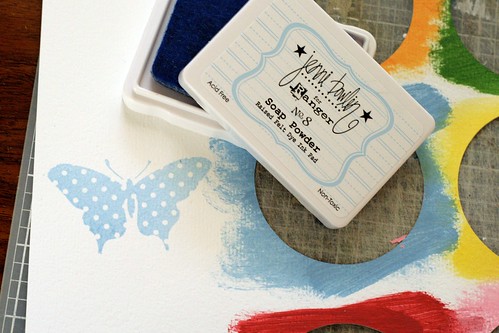
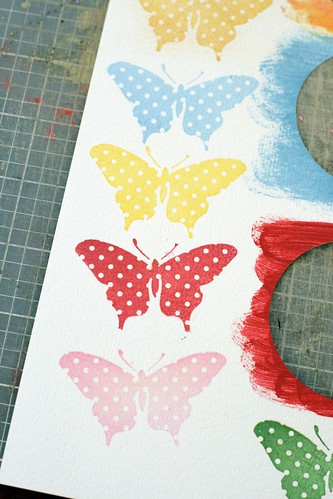
(ink colors, from top to bottom: Chicken Feed, Soap Powder, Lemon Drops, Cough Syrup, and Chewing Gum)
Then trim out the stamped images and adhere them to the circles (I used foam squares) and embellish with a pearl button:
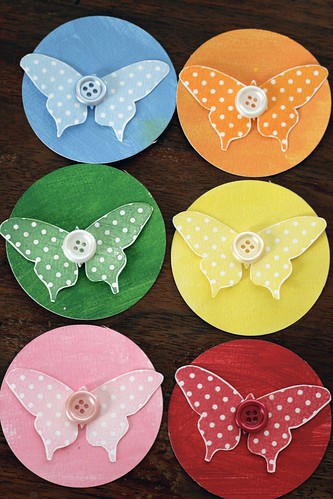
So what can you do with the JBS paint dabbers and inks? The possibilities are endless! We'd love to see your creations, so be sure to share them by posting in the JBS Mercantile Gallery. Happy Scrapping!

Tuesday, February 22, 2011
One Million Yellow Butterflies
Loved making my first canvas! I wanted to recreate a memory I had with my brother when we were younger. I love the result!
The Story: My brother and I were on a bike ride in Vermont. I was trailing behind him and as we started down a big hill, it looked like he was going to ride right through a bunch of leaves on the road. As he approached, I could see that those leaves were in fact Swallowtail Butterflies that all took off into the air as he rode through. Since I was behind him, I was able to see the incredible site of one million yellow butterflies rising from the ground and flying into the sky around him.
Supplies used:
Jenni Bowlin for Ranger Dabber in Lemon Drops and Stick Candy.
Jenni Bowlin for Ranger Dye Ink in Fountain Pen.
Gesso, Gel Medium, Mod Podge
A lot of the technique I used on this canvas was learned from an Art Journaling class taught by Dina Wakley on Get It Scrapped!
I covered the canvas with gesso and then gel medium. I made impressions into the gel medium with silk flowers, and container tops.
After the gel medium dried, I worked the paint into the canvas and sprayed it with the Fountain Pen dye ink in a mister. You don't have to be an artist to get a great title and journaling on canvas. I used Jenni Bowlin Studio letter stickers and love the look I got. Rubons applied to the canvas easily also.
I applied some of the butterflies onto the chipboard and some I adhered directly to the canvas. After everything was placed where I wanted it, I covered it with a layer of Mod Podge to seal it.
The beauty of using the JBS paint and ink products with other JBS products is that the colors coordinate and blend with each other so well!
Monday, February 21, 2011
The Mother Lode
On this Presidents' Day, one of the great men that we honor is Abraham Lincoln, who once claimed, "All that I am, or hope to be, I owe my angel mother." Thus, today's post not only honors Lincoln, but my own "angel mother":
Among the new items in the CHA Winter 2011 release are lovely silhouette rub-ons, one of which is featured on this layout along with papers and journaling cards from the "Be My Guest" line. When I first saw this silhouette, I felt a sense of recognition, and then I realized that I had seen this little girl before, in the visage of my one-year-old mother. Uncanny, am I right?
This page also continues this month's focus on JBS for Ranger products. To complement the soft pink and white on the page, I used a few of my favorites, including a Malted Milk felt dye ink pad (which I rubbed over the dotted cardstock and around the edges of the inner cardstock) and Chewing Gum dye ink (misted over the center piece of cardstock). Even used subtly, these products bring so much to the page.
Friday, February 18, 2011
Dina Wakley Loves to Travel!

Today we have a great travel themed layout from our resident Ranger expert, Dina Wakley. Dina says, "For our special focus on Jenni's awesome Ranger products, I put a good squirt of Lemon Drops Re-inker into a Mini Mister, and then filled it up the rest of the way with water. I used my custom spray ink and a stencil to create the sunburst motif on the cardstock. The motif was very bold, so I didn't need to add too many other embellishments (I always say that ink is the ultimate embellishment!). Some JBS letters, bingo cards, and little blue star stickers complete my layout, which is a tribute to how much I love to travel."
Thursday, February 17, 2011
Anything is Possible by Becky Novacek
 Today we have a gorgeous altered frame dressed up with bits from the February Kit from Becky Novacek. Wouldn't this be a dreamy addition to a little girl's room?
 Becky writes, "Old frames make me happy. It's so easy to transform them from ugly-ish oak to a fresh looking painted pink. I taped off the inner linen trim and really like the effect.
For this framed piece, I simply trimmed the pretty pattern paper from the February kit and then added a few punched tags (also from the kit). The only bit that I added from my supplies is the little vintage flowers."
Wednesday, February 16, 2011
Love and Cherish!
Hi there! it's Wilna here. This month we are highlighting the wonderful Jenni Bowlin for Ranger product!
Let me tell you, it's so much fun to play with those inks and ink pads. For this page, i used tags and i die cut 2 words (using my slice): Love and Cherish. The i just played with it by spraying some ink over the die cut word to get the silhouette. I used Brown sugar and Cough Syrup. For the stamping, i used the Brown sugar ink pad. I would love to see what you come up with using theses adorable colors and inks.
Much love
Tuesday, February 15, 2011
Clock redo by Kerry Lynn Yeary

When I received my box of the new JBS release "be our guest" I knew I was going to recover a boutique clock that I have had in my "to do" project box. However, once i placed the paper over the center i realized that the diameter of my clock was about 2" larger than the clock diecut.

Then I remembered that I still had some of the vintage pattern paper left from last month's JBS mercantile add-on kit and decided adding some vintage papers would solve the problem perfectly. I used soft gel medium from Golden, but you could use modge podge as well.
I ripped the papers into 2" x 3" squares {approximately} and then after peeling away the original paper design that was on the clock {it created a ragged and bumpy layer, which gave me a better surface for the gel medium {which will act like a glue} to stick to, you could also sand it a bit instead} I painted a layer of gel medium and then applied a piece of the vintage pattern paper and then another layer of gel medium across the top to seal. then i repeated this pattern as i rotated the clock as seen above until I had covered the entire outer edge.

Here's a nice detail shot of the edging and the die-cut. After the gel medium layers dried i cut a small circular hole in the center of the die-cut with an exacto so i would fit over the clock mechanism {of course i had already removed the clock hands} then i glued it in place.

I love how the paper adds some texture but the muted vintage paper color doesn't distract from the die-cut clock paper. If you can't find a clock to redo you could always buy a clock mechanism from the craft store {they all carry them} and mount it on a few layers of chipboard cut to size.
Happy Tuesday!

February Mid-Month Release!
 Mid-month releases post at 10am CST today! Check Jenni's blog for a few more peeks at all the vintage goodies that will be stocking our shelves.
Monday, February 14, 2011
Easter Wishes by Ranjini Malhotra
 Continuing with our Ranger theme this month, we have a charming Easter card from Ranjini with a great stamped background. Ranjini says, "I used Jenni Bowlin for Ranger Ink Pad in Seed Packet with a clear polka dot background stamp from Papertrey Ink to create the dotted background. Then I added goodies from the February Kits mostly to create this little easter greeting. I did stamp the background twice for a darker color green."
These bunnies are way adorable! Thanks for the inspiration Ranjini!
Details . . .

 Becky always has an amazing eye for mixing colors and patterns in her hand-cut titles. This month she threw in a brad for an "O" for added dimension and detail.
 I love how Danielle is inspired by product. This month she used the vintage memo paper from the add-on kit as the base for this delightful thank you card.
 Wilna is just a master with neutrals. This month she's collaged a variety of neutral elements for her background then add fun whimsical bits on top for a classic Wilna look.
 Lining elements up all in a row is a great way to spotlight them and it makes a great design element as well as Ranjini shows us here with a row of brads.
 We see lots of homespun elements on Michelle's layouts, like here with the lovely bow, trailng threads, brads in buttonholes, tiny stitches, and always a touch of distressing.
 Lisa demonstrates that a touch of Malted Milk Paint Dabber adds a great deal of depth to a white cardstock title.
 This is such a sweet look that Kerry Lynn has created here with the layered buttons and brads in the heart shape.
 Keisha is the queen of vellum. I think she has single-handedly made it all the rage again. I know I find myself reaching for it more and more often lately.
 This is a gorgeous look that Jill is creating each month with her tiny bits on bingo cards in her monthly "Savor" mini-album. This would also be a great trick to try for this months Sunday Star challenge!
 The letter stickers in this month's papercrafting kit are perfect for altering. Dina loves to do this with sharpies. It's a fun way to get more variety from your alphas.
 Product doesn't have to be left as is. Make it work for your purposes as Celeste has done here by trimming out the boys from one of the number flashcards and popdotting them on this layout about her two sons.


