
Tuesday, May 31, 2011
The Girls' Fund

Sunday, May 29, 2011
Sketch Challenge!

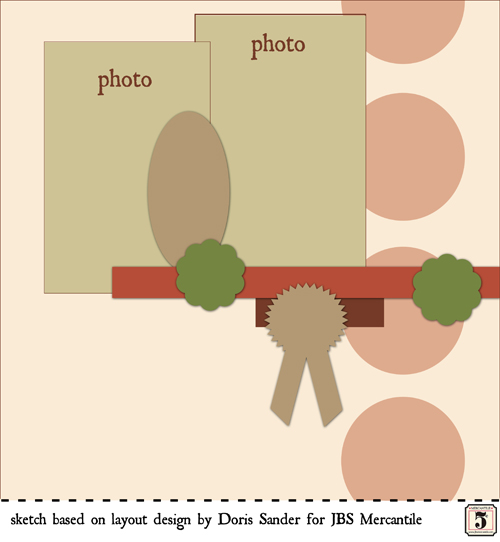 This week's challenge is a sketch based on the layout below by Doris Sander. Share a link here with your take on this sketch. We'll choose a winner for a $10 gift card to JBS Mercantile on Sunday, June 12th. Happy Scrapping!

Four Ingredients Challenge Winner!

 Congratulations to Christina Aiton, this week's Sunday Star Winner! We just love how she reminds us to stop and appreciate the beautiful things in our lives. Thanks for the inspiration Christina . . . email me at doris.sander@gmail.com and I'll get your gift card sent to you.
Friday, May 27, 2011
Portfolios on Sale!
 Newsflash! Jenni has put a few of the portfolios from this month's project kit on sale in the General Store. If you want to put your own personal stamp on them like Ranjini did, this is a sweet opportunity as they are ony $2 for TWO in a pack . . . a $5.97 value!
Blue Ribbon Stamp Embroidery

hey everyone, kl here.
yesterday you saw a gorgeous butterfly embroidery by shimelle and today i wanted to show you another embroidery technique, turning the gorgeous blue ribbon stamp, which i embroidered on linen, into a sweet pin that you can include on a gift card. this one is going to my son's kindergarten teacher {who my daughter also had for kinder} as i thought it would be a sweet end of year gift to show her that she's someone that my husband and i believe is one of a kind.

to start i stamped the blue ribbon onto linen that i already had mounted on a mini hoop with a light hue ink so that the stamp won't show through once the embroidery is complete. i used white back-stitches on the ribbons, alternating long stitches around the rosette and then i filled the center of the rosette with french knots. the embroiders guild website has a great stitch diagram for stitching if you are a beginner {here}.
after the stitching was complete i removed the linen from the hoop and trimmed the linen leaving at least .5" of edging around the entire design. then i tucked the linen edging to the back by tacking it with a hot glue gun.

after tacking i added a pin back to the center of a piece of felt and then mounted the embroidered image onto the felt with hot glue. then i trimmed the felt to within .25" of the embroidery with pinking shears.
hopefully our children's kindergarten teacher will know just how much we appreciate her and how lucky we feel to have had her introduce our children to their first year of school with her.

Thursday, May 26, 2011
Stamping Shenanigans: butterflies...

Hi there! Wilna here. For today's Stamping tip and trick i made some butterfly cut outs ( used my slice) and stamped them with the gorgeous Jenni Bowlin Butterfly stamp and i used The Malted Milk Ink. I love how the texture of the stamp added so much dimension to the plain die cut. I am sure you can use any type of texture to create this effect... (i just thought of using text stamps- yum!)


happy stamping!
love and a kiss

Wednesday, May 25, 2011
June Sneaks!
 You're so going to love June's kit offerings. Jenni has chosen the perfect mix of product to make our new release, "Haven," shine. Here is a peek from Keisha Campbell.
 And another from Doris Sander. And speaking of Jenni, have you seen the new mini-album with the wooden spools spine that she posted on her blog yesterday? Pure creative genius!


Tuesday, May 24, 2011
Home Mini-Album by Jenni Bowlin
 If you're like me, you love seeing Jenni Bowlin orginals. Each one is such a treasure. This golden mini-album she created when she moved into her new home is truly stunning.
 I especially love the vellum inserts. They add such an elegant, classic Jenni touch.
 Nobody does vintage chic quite like our Jenni. :)
The Butterfly Stamp + Embroidery
I stamped in pink then used three strands of embroidery floss to outline the full butterfly. I find it easiest to stitch on knit fabrics with a hoop, but it's best to stamp without the hoop so the design will be in the right place and not distorted. I just pop a piece of scrap cardboard inside the item so it's easy to stamp on the knit. Once you add the hoop, pull it taut but not tight - you don't really want to stretch the design.
The butterfly is a quite detailed stamp, so you could spend a long time following all the lines with your stitches! I opted to just add a bit of the detail in the top and bottom of the wings, then some wording across the middle. For the lettering, I just wrote in pencil and stitched over my letters. If that's too hard to judge, you could use letter stamps as a guide or print it out on paper and hold it up to the window and trace through the fabric.
The stamp ink will fade with several washes (unless you use special fabric inks) but I like this design both with the ink and with just the outline, so I don't mind if it fades. (Of course it's not for me so really I should just hope that baby and her mama don't mind!)
In progress . . .

Beautiful! Thanks for the inspiration Shimelle!
Monday, May 23, 2011
One More for May . . .

 I know there are all types of "kit scrappers" out there; I'm of the variety who likes to feel she's finished one kit before the next one arrives. Now I had already done six layouts with May's Kits which is more than plenty I think, but still there were a few lovely bits nagging me.
 I shockingly hadn't even opened the awesome alpha from the Farmer's Market Add-on . . .
 It killed me that I hadn't yet used an optical lens from the Project Kit, I still had that sweet transparent envelope from the ephemera pack in the Main Kit, and I've had it in my mind to use the Mercantile Sticker for the longest . . .
 And then there was the vintage negative and its sleeve from the Flea Market Add-on that I just could NOT not use . . .
So I whipped up this layout this weekend. The background is just random bits of patterned paper and ephemera adhered to grey cardstock and then covered with gesso. I then added lots of charming embellishments and my journaling from an old blog post. Love.
And now I can disassemble my kit remains with a sense of accomplishment. I will keep my absolute favorites (like the last 4x6 scrap of that yellow daisy paper) and send the rest to my sister who teaches high school art. She is always so happy with my leftovers. And now on to the June Kits! Peeks on the 25th! Happiness abounds. -doris :)
Stamping and Beyond: Lollipop Bouquet
After playing around with the new Jenni Bowlin Stamps, I decided to dress up some little lollipops with the stamped images and create a “bouquet”, a fun project for kids to make at a birthday party! Or they could be used as thank you gifts, or even just a display on a birthday table! I started with Jenni Bowlin’s 3” x 3” Seal stamp and used a Lemon Drops Ink Pad. It was stamped onto white cardstock and cut out. Then I snipped a little piece out of the image.
 Next, I folded the two ends of the seal stamp together and attached with a Glue Dot. This creates a cone shape that will form around the lollipop better than a flat image. I poked a hole in the center where the lollipop will go.
 Then I stamped the solid image of the 3” x 3” Blue Ribbon stamp onto white cardstock with Chewing Gum Ink, and then topped it with the outline stamp in Cough Syrup Ink. I cut it out and poked a hole in the center. (I didn't stamp the tails of the Blue Ribbon, just the circle.)
 These two finished stamped images were layered together and a lollipop poked down through the hole. I used a Family Tree paper to cut the green polkadot leaves and attached them under the lollipop flower.
 If your lollipop is flat like the one below, you can adhere the flower underneath it and add a 3” x 3” Butterfly stamp like I did here. I topped it with a Yellow Rhinestone Bow embellishment.
 I used a $1 small wooden box from the craft store and wrapped it with red ribbon. The bottom is filled with foam to hold the lollipops. I cut an egg shaped foam in half that I had in my craft box and adhered it to the bottom. You will need to adhere it, because the lollipops are heavy and tend to want to fall over.
 Now just poke the dressed-up lollies into the foam!
 You can also cover the center of the stamped image with a 2” circle cut from patterned paper like this one.
 If you use these for display on a table, you can punch some extra patterned paper circles to sprinkle on the table and add more stamped butterflies scattered around for an extra fun touch!
I started with Jenni Bowlin’s 3” x 3” Seal stamp and used a Lemon Drops Ink Pad. It was stamped onto white cardstock and cut out. Then I snipped a little piece out of the image. Next, I folded the two ends of the seal stamp together and attached with a Glue Dot. This creates a cone shape that will form around the lollipop better than a flat image. I poked a hole in the center where the lollipop will go.
 Then I stamped the solid image of the 3” x 3” Blue Ribbon stamp onto white cardstock with Chewing Gum Ink, and then topped it with the outline stamp in Cough Syrup Ink. I cut it out and poked a hole in the center. (I didn't stamp the tails of the Blue Ribbon, just the circle.)
 These two finished stamped images were layered together and a lollipop poked down through the hole. I used a Family Tree paper to cut the green polkadot leaves and attached them under the lollipop flower.
 If your lollipop is flat like the one below, you can adhere the flower underneath it and add a 3” x 3” Butterfly stamp like I did here. I topped it with a Yellow Rhinestone Bow embellishment.
 I used a $1 small wooden box from the craft store and wrapped it with red ribbon. The bottom is filled with foam to hold the lollipops. I cut an egg shaped foam in half that I had in my craft box and adhered it to the bottom. You will need to adhere it, because the lollipops are heavy and tend to want to fall over.
 Now just poke the dressed-up lollies into the foam!
 You can also cover the center of the stamped image with a 2” circle cut from patterned paper like this one.
 If you use these for display on a table, you can punch some extra patterned paper circles to sprinkle on the table and add more stamped butterflies scattered around for an extra fun touch!
Sunday, May 22, 2011
Vintage Ad Challenge

 Our challenge this week is to get inspired by another vintage ad from Michelle McCord's stash. How does this ad inspire you? Will you do a juicy summer fruity layout? Will you add a little (or a lot) of the color orange? Will you use it as the foundation for a sketch? Do the fun fonts draw you in? Will you print it out and scrap with it? Please share your inspiration with us in the customer gallery! Put "Sunday Star: Vintage Ad Challenge" in the comments section! We'll pick a winner on Sunday, June 5th and that winner will receive a $10 gift card to spend at JBS Mercantile. Happy Scrapping!
More "By the Sea" Mini-Album
 I'm finally back with installment #3 of my "By the Sea" mini-album from the DeLovely Kit. With this post, I wanted to mention my method for embellishing mini-albums. As I said earlier, I like a really fancy cover, but a simpler interior. Once I decide on my theme then I gather my supplies and get busy creating. I like my pages to flow from one to the next with a sense of continuity between them. To achieve this, I use one set of papers throughout and then choose a couple ideas to repeat on every page. In this album, I have my yellow snowflake seaweed (it's really that color and shape on the beaches where I grew up) and a red dotted flower with a yellow rhinestone center on every page. Other than that, I have changed up the rest of the embellishing by mixing in chipboard bits, buttons, tags, and journaling spots. This method has made mini-album making fun and easy and the finished product really makes sense to me. -doris :)
Saturday, May 21, 2011
Love This JBS Core'dinations Cardstock
 I did a little self scraplift with the new JBS Core'dinations "Love This" Cardstock and I think the results might be even sweeter than the original. I had this adorable photo of Stephanie Howell's girls that she gave me at Vintagefest last year and thought it would be perfect to use. The original was made with bits from the DeLovely Kit. I pretty much followed the original just changing the papers for "Homespun" and "Be Our Guest" mini papers and swapping out the embellishments for Pearl Buttons, Vintage Style Sew-On Buttons, Star Stickers, Flag Stickers, and Vellum Butterflies. I did want to mention that this layout works equally well for a landscape photo as well as a portrait. In my orinal, the photo was vertical and I just trimmed a bit off the end so it would sit in the bingo frame. For the new layout I had a horizontal photo, so I just trimmed it to 4x4 and then added a strip of patterned paper to the empty spot on the bingo card. Easy peasy with fun results. -doris :)
Subscribe to:
Posts (Atom)