Wednesday, February 29, 2012

New Digital Release - You're Going To Love it!

There were two new releases Monday at the JBS Digital Shoppe at JessicaSprague.com :


Jenni's classic butterfly rub-on in digi format!


And another classic:  Jenni's Chipboard Alpha in a fave red on cream color combo!

Both kits come with punchables if you're looking to use your Fiskars/JB punches in a new way!

You must see what two Creative Team members did with these products:


 A stunner from Jen McCabe ...


and the most adorable layout from Sarah Champion.

Just wonderful!


Pin It!

Tuesday, February 28, 2012

bluebird of spring by Leah

With March approaching, most people's thoughts in the United States turn to spring. Wouldn't it be fun to chase away a friend's winter blues with these sweet spring wishes?

Supplies that you'll need:
For the bird, you'll need the Malted Milk paint, crackle medium and Soap Powder paint:

Give the small chipboard bird a coat of the Malted Milk paint and allow it to dry thoroughly. Feel free to use your heat gun, but keep it as a distance. The heat can sometimes bubble the paint as it dries:

Apply a nice coat of the crackle medium and let it dry. The less you push the medium around when you're spreading it on, the better crackles you'll get on your finished piece. Allow it to dry. If it's wet at all when you apply the overcoat, it won't crackle.

Spread a nice, thick coat of paint on top of the dry crackle. Make sure you have plenty of paint on your brush and spread evenly - you can't go back over your work much, because the crackle medium can cause the paint to clump.

Watch it crackle as it dries. I don't like using a heat gun to dry this, unless I keep the gun well away from the piece, so that the paint won't bubble.

Distress your chipboard bird by dabbing your finger in Malted Milk ink, and swiping it across the bird in the same direction as the crackles.

Finish the edges with the same method, using the Brown Sugar in.

Attach the wing using a hot glue gun, and add a rhinestone for the eye. then set it aside to create the base, and "nest" for your bird.

Apply Stick Candy paint to the small chipboard flower from the package. Once it dries, apply a coat of Crackle Accent. Set it aside to dry.

Apply a coat of malted milk paint to the tart tin and allow it to dry.

Distress the tin using the same method as the bird, using the Malted Milk, Brown Sugar and Speckled Egg inks. Just gently press your finger in the ink pad and brush across the tin. You can wipe excess off using a paper towel if you need to! Allow the ink to dry.

Glue a small piece of the floral foam to the bottom of the tin, using the hot glue gun.

Hide the foam by gluing a piece of the Spanish moss to cover. Cut off any flyaway pieces.

Press bird into the foam and add hot glue to hold.

Once the crackle on the flower for the base is dry, distress it first with the Stick Candy ink, and then with Brown Sugar ink.

Add some floral moss on top and glue.

To make the banner piece, curl the paper around the edges.

Distress with Brown Sugar ink and the ink blending tool.

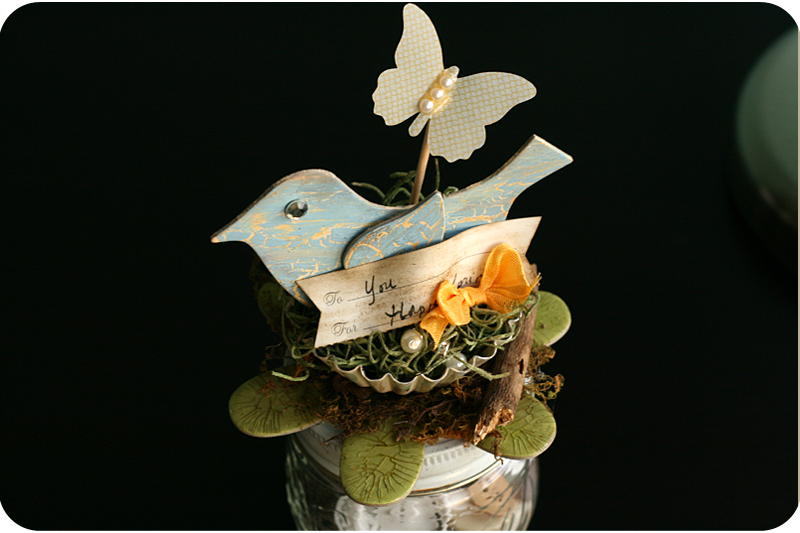
Glue the tart tin to the base, and add the stick on the side. Embellish your bird by adding the tag, bow, pearls, and mounting the butterfly on the stick behind the bird. 

All finished and ready to give to a friend or enjoy yourself!

I hope you enjoyed this sweet little project! Leah

Pin It!

Monday, February 27, 2012

My Wish by Becky Novacek

Today's inspiration is brought to you by Becky Novacek . . .

Even though Valentine's Day is past, I still have love on my mind. This layout is based on how truly thankful I am to see my grown children in love and living it out.


I have wanted to use the silhouette stamps since they came out originally and since they're now available again (get them while you can!), I HAD to use them! I really like how they paired with Fountain Pen Stamp Pad. Not too dark and not too light.

The pattern paper covered chipboard heart is one of the JBS foundation pieces that I use again and again. It adds just that bit of depth that adds so much to a project.

The red crepe ribbon that's tucked under the book page is still available, which makes me very happy. Another bit of texture that adds a little something.

"YOU" is handcut from scrap fabric and an old quilt.

I hope you're still feeling the love during the month of love!

Thanks for the inspiration Becky!
Pin It!

Sunday, February 26, 2012

March JBS Mercantile PEEK

Magpie is taking center stage in the March JBS Mercantile kits.  In this page captured by Megan Klauer, you can see just how photogenic Magpie really is.  You're going to love this sweet spring line.  You can see a couple more sneaks of March's offerings on Megan's blog.  :)
Pin It!

Friday, February 24, 2012

JBS Mercantile February Guest Diane Payne


Our Guest at JBS Mercantile this month was the lovely and talented Diane Payne.  We so enjoyed her work in the February gallery and thought you'd like to get to know her a little better.  Welcome to the Inspiraton Blog Diane!


Hi, I'm Diane Payne. I reside in Dallas, Texas with my wonderful husband, our two teenage children and two adorable dogs. When I'm not working, I enjoy spending time with my family, running, boating, photography, and looking for vintage treasures at flea markets. My favorite vintage find is my 1930's Underwood typewriter, which I use as decor and for journaling on my layouts.

I started scrapbooking in 1997, shortly after my daughter was born, and I enjoy it as much today as I did then. Although I love recording the details of our life, I enjoy the creative process of scrapbooking as much as the memory keeping. I scrapbook with a variety of photo styles including current, vintage and Hipstamatic prints. I love sharing my work with others and am thrilled to have the opportunity to guest design for JBS Mercantile this month.

Although I'm typically a layout girl I really love this card and treat jar I made with the Artisan kit. I love the bright colors and whimsical feeling of them.

This photo is far from being perfectly lit and composed but I love that I captured the emotion and joy of the moment. I smile every time I see this photo.

This is the calm before the creative storm in my crafting room. I store my tools out on the desk so they are easily accessible and smaller supplies in open baskets. If my supplies aren't easy to get to, I won't use them.

Find more of Diane's work on her blog and in her Etsy shop.
Pin It!

Thursday, February 23, 2012

To Do Lists from Stephanie Howell

Today's projects are brought to you by Stephanie Howell who writes, "When I saw the new chalkboard easels I fell in love right away. When I had the opportunity to play with one...my initial suspicions were confirmed. They are AWESOME."

"I used my easel as a "to do" list and inspiration board. Color swatches, flowers, things i need to do, a pocket for receipts...all in one handy little place. Love love this new item."

"I also was excited to work with the printed pockets. I guess you could say I went a bit overboard...covering an entire page with them. HA!"

"Jenni really knocked it out of the park with the new release. I am in love with EVERYTHING she designed!"
Pin It!

Wednesday, February 22, 2012

Inspiration is on the way!


The newest edition of The JBS Mercantile Gazette is hot off the presses and ready to inspire you!  This month's issue includes a video tutorial from Karen Grunberg on collage pages, plus our Schoolhouse Sketch and Mercantile Multi-Photo.  We're also debuting some brand new features - Inspiration Station and Project Life, along with much, much more to get your creativity flowing. So pull out this month's kit and download your copy now!
Pin It!

Get organized with Jenni Bowlin Studio

I was really excited about adding the "Have a Treat" divided box to my scraproom. I know for me, one thing I struggle with is organizing my scrapbooking supplies. That's why I love little boxes like this! They are just perfect for keeping all your favorite embellishments handy.
This would be great for all you project lifers too!
PhotobucketPhotobucketPhotobucketPhotobucketPhotobucket
Find all the goodies here:
Divided Box, Buttons & Brads, Journaling Cards, Memo Books, Chipboard Buttons,Vintage Style Wooden Spools.

Now have some fun & go get yourself organized!
Pin It!

Tuesday, February 21, 2012

A hint of spring

Spring is just around the corner and I am ready for a bit of color and whimsy around the house. I figured that some colorful pinwheel decorations would do the trick!


If you've never made a pinwheel, don't worry because it's incredibly easy. Simply cut a square of paper (any size). Cut in from each corner of the square toward a center point. Stop cutting just short of the center. Then pull over the same corner of each quadrant, affixing the point in the center.


The JBS vintage and chipboard buttons are great foundation pieces that can anchor your pinwheel in the center.


Here's what you will need to get started on making these pinwheels:


Mindy
Pin It!

Monday, February 20, 2012

Digi Monday and a Teeny Hybrid Project!

Today's digi release at JessicaSprague.com is another gorgeous classic paper collection in Jenni's classic Red, Black, and Cream.


Creative Team member Lisa Breuer created this lovely digital layout of her daughter:


An exciting BONUS addition to Jenni's digital kits will be showing up from time to time.  In this kit, you can find a bonus scalloped banner "Punchable" pdf.  "Punchables" are pdfs that when printed,  work with Fiskars/Jenni Bowlin punches to create hybrid embellishments.

Punchables are quick and easy to use, and very little computer knowledge is needed!

The pdf is simply printed on the paper or media of your choice ...


 ... punching instructions are included on the pdf, but these are so very easy to use ...


In the Vintage Red Collection kit, the "punchable" contains various scalloped banner images for use with the Fiskars/Jenni Bowlin Scalloped Banner punch.


I created this sweet teeny photo display of my boys with the Vintage Red Punchables, and flashcards from my Mercantile Kit stash!


The great thing about digital is that you NEVER run out!  When you download this kit, you will have an unending supply of the Vintage Red Paper, Journaling Cards, and sweet Punchable banners!


Pin It!