Pages

Friday, March 29, 2013

New Digi Release: Labels and Seals!

Thank goodness its Friday, because Jenni's got another fabulous new release over in the digital shoppe at Jessica Sprague.com!

The new Label and Seals brush set features 12 beautiful vintage labels in .png and .abr format, several of which are some of my most beloved stamp designs from Jenni Bowlin Studio and quite possibly yours too!


These beauties will be on sale for 25% off thru the weekend so stop by the digital shoppe and grab them--but first how about a small dose of inspiration from the JBS Digital Creative Team!

I've used the labels and seals from this week's release in a couple of different ways in my own page. First I've turned the "Seal" stamp into sticker-style frames for these two tiny photos of my boys.  Then I used the "Ornate Frame" to create a watermarked border along the top and bottom of my kraft background.

Layout by Amy Kingsford

Chrissy Guido has used the "Ornate Frame" stamp to draw attention to her beautiful vintage photo on this bright and cheery heritage page.

Layout by Chrissy Guido

And finally Nirupama Kumar shows how truly versatile these stamps are in this beautiful hybrid page.  I just love the tie-dye effect she's created with the "Diamond Ink" stamps that make up the eye-catching border that runs along the right side of her page and she's also used the stamps to create practical labels for her journaling.

Layout by Nirupama Kumar 

Beautiful pages ladies!  Thanks for sharing.

And don't forget the Labels and Seals are on sale this weekend only--sale ends Sunday night!


Thursday, March 28, 2013

Stencils, gesso and paint Siiiiigh! :) :) :)

Hello Hello :)

Today I would like to share with you some creative fun I have been having with some wonderful Jenni Bowlin Studio products and the awesome Dina Wakley 12 x 12 Messy Circles stencil.


For this layout I first created a patterned background using Dina's messy circles stencil and Modelling paste. Whilst the paste was still wet I over sprayed with some watered down 'Seed packet' paint and then sprayed this with some misted water. I then allowed it to dry before completing my layout.


As you can see from this close up I have used some of Jenni's wonderful new release product, the Kraft Feather tags :)


Well that be it from me for the mo :) I do hope you have been enjoying the amazing stencil and punch creativity by the Jenni Bowlin Studio Creative Teams!!!!!

Cheers and happy Scrapping,


Wednesday, March 27, 2013

she learned to let go...

{supplies: letter chaos stencil, modeling paste, gesso, mini mister, speckled egg re-inker, various other blue and green inks, modern mercantile papers, silver feather rubons, chicken feed and cough syrup paint}

This past weekend I was browsing around a bit on my ipad when I realized that I could purchase Dina Wakley's book Art Journal Freedom as a download from the iBooks app. Art journaling is one of those things that I've always wanted to explore more - I just haven't had the time to take a class or really check into it like I should. And deep down - I was a bit afraid of what might happen if I did...

All I can say now is that Dina's book has opened a new world for me. She's given an awesome list of starting supplies and great tips and techniques. And that's only in the first two chapters. I'm sure this page is only the very first of many to come.

~ Leah

Tuesday, March 26, 2013

The Pinwheel punch

Hi everyone! Harumi here!
I want to share with you a layout I did using the pinwheel punch and the feather gold rub-ons.


I love the Modern Mercantile papers! I chose Miscellany as the yellow stripes and gold flowers are very lovely! The gold feathers and flowers match so well and are so gorgeous!


I used the Etcetera paper for the pinwheels and circles. I am enjoying working with the many patterns of the Modern Mercantile line.

Happy Creating!

Monday, March 25, 2013

JBS Mercantile April Peek

I spy with my little eye . . . stunning gold sequins, two new exclusive papers from Lisa Dickinson, an exclusive floral stamp embossed in gold, an oversized doily, and pretty bits from Elle's Studio, Webster's Pages, Studio Calico, Martha Stewart, and Heidi Swapp.  Pretty Pretty Pretty!

And Doris Sander's two cute nieces, of course!  :)

Sunday, March 24, 2013

Quilt Star Garland


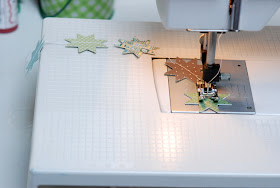
The Fiskars/JBS Quilt Star Garland is one of my favorites.  Playing with it one day, I found that combining two Quilt Star punches can make the sweetest 3-dimensional shape.  Here's how I made the Quilt Star Garland shown above.


I used the Etcetera sheet from Modern Mercantile by Lisa Dickinson.  The colors are great for spring and I wanted my garland to welcome in spring.  The small prints work wonderful with punches too.


Layer two punches together - I always picked two punches from different patterns.  Holding the layers together, stitch down the middle of each grouping.  Sew them close together or far apart.  It's up to you.


Create the 3-dimensional effect when you're finished sewing your strand of stars.  Pull apart the quilt stars so the sides open up and are held together by the stitching in the middle.


Such a sweet garland for the spring.  And fun to make too!


The Princess and the Dragon

It's Natalie here, I want to tell you all about my most favourite JBS punch and maybe share a little technique too ;-)


I've put this punch to good use here on this layout. Can you spot it? Here's a close up...


You guessed it... It's the JBS Classic Bird Shape! But I've used it in a slightly different way to what you might imagine. Instead of punching out the birds to use as embellishments (although that's a perfectly reasonable method too!) I've punched out a row of the birds into a strip of cardstock and then I've used this as a home-made stencil.


I laid the stencil where I wanted it and then spread a think layer of Liquitex Modelling Paste over the top. While it was still wet I sprinkled it with some glitter knowing that the modelling paste would also act like glue. When I lifted the stencil off I was left with this lovely textural strip of sparkling birds.


Sticking with the bird theme I chose the "Letter From Bird-Land" paper from the Wren collection as my background. My layout tells the story (or fairytale really) of a Princess Birthday Party my 2 young girls went to recently. Little did they know their father was going to become the 'villian' of the party by dressing up as a Dragon and blowing fire at them as they passed by! Ahhhemmmmm..... yes you're right - those are fairy wings on his back.... but it was the closest we had to a dragon costume ;-)


Since I've started working some 8.5 x 11" layouts into my repetoir I've decided to turn all those off-cuts into a card.  The card and paper was already cut to the right size, I just simply folded it in half. And because I had all my supplies out I didn't even need to make any new design decisions!


What an easy-peasy way to add some cards into my dwindling stash! I even ended up using those punched out Classic Bird Shapes from creating my stencil. Nothing goes to waste in my house ;-)

Hope you enjoy what's left of your weekend. 
xxx

Friday, March 22, 2013

Our Weekend Digi Release!


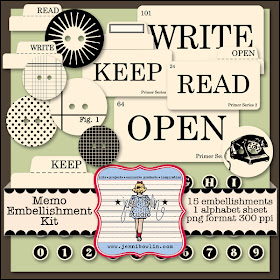
Hello!  Take note!  Our digital Memo Embellishment Kit is here!


This is such a cute little kit with a lot of uses.  You'll find buttons, flashcards, index cards, and alphas for your digital or hybrid projects.

Audrey Tan used the index cards to make this amazing creative title:


Read & Write by Audrey Tan
Showcasing Memo Embellishments
Supplies:
Jenni Bowlin Studio: Front Porch Collection, Labels & Seals, Memo Embellishments, Classic Border Shapes
Pink Reptile Designs: Stunning Stitches
Anna Aspnes: ArtPlay Palette Enamored
Traci Reed & Jenn Barrette: The Bad
Font: Pea Emmie & Ultra
Van Nguyen used the index tabs to add captions to the photo blocks on her page.


     Exploring and Playing Layout by Van Nguyen
Supplies: Jenni Bowlin Studios (Memo Embellishment, Beach Party, Play Date, Be Our Guest); Liv.e Designs (Template).

Brynn Marie Dukes created a sweet embellishment cluster with a flashcard, button, and other JBS digital goodies.  I love her index tab title placed off to the side.

Memo Embellishment Kit, Mercantile Mix 2, Chalkboard Red Alpha, School Bingo Cards, Vintage Bling by JBS
Stitches by Amy MartinPaint by Karah Fredricks

Thank you Audrey, Van, and Brynn for your awesome layouts!

Thursday, March 21, 2013

Fiskars and Jenni's Label~

Hi everyone, I wanted to share with you a layout I did using some of the awesome, new products released at CHAW 2013.  The paper is Vintage Modern. Gorgeous, rich paper colors are  so easy to work with.  Other products used were the new Rub-Ons (Canning Jar fun, Feathers ~gold and black). They applied so easily and look great!!

The two Fiskars punches used were Jenni's Label ( she has her own punch named after her:) and Quilt Star.  Just FYI~ many of the digital kits have punchables images.  Just another reason to have all the punches!
*************************************
Calvinball is going on in the forum~stop in and check it out!  Prizes and fun promised!

Wednesday, March 20, 2013

Just in Time

The two digital kits we have on sale today have arrived just in time for Spring and Easter.

Be Our Guest is 50% off today:


I just love the colors and graphics in this line.  This kit is versatile and can be used for a multitude of themes.

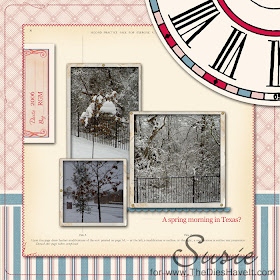
Susie Moore used the die-cut clock graphic as a striking focal point in the corner of her layout.


Audrey Tan combined strips of the patterned paper with a smaller version of the same clock image to matt her photos.  Her embellishments are so very sweet!

Nan's Boys by Audrey Tan
Showcasing Be My Guest collection.
Supplies:
Jenni Bowlin Studio: Be My Guest Collection, Jeweled Butterflies, Vintage Whimsy, Feather Stencil Cuts, Transferware Flowers, Chalkboard Alphabet Red On Cream

Our Easter Bingo Card Kit is also on sale for only $1 today!

Can't you think of a million and one things to do with this kit for Easter?!  I can't wait to get scrapping with this!


Thank you Audrey and Susie for your wonderful pieces of inspiration!


Creating a grid within a grid

Happy Wednesday everyone!  It's Jenni Hufford here and I wanted to share a fun layout I made about our recent venture--- owning chickens!


I created a basic grid-- and of course had to add that rooster card and falt back!  The feather tags also went perfectly with my spring chick theme.


Adding pieces from the Modern Mercantile Hodge Podge Page as the base of my grid pieces. I placed them in a triangle shape.   The remaining spots I used "non square" items to add a different feel to the grid.


In one of the spaces I used the Quilt Star Punch and created a grid within a grid.

Thanks for stopping by today!

Tuesday, March 19, 2013

Wish You the Best from Karine

Hello

Today I want to share with you a very soft lay-out, with natural colours. And I so wanted to use the new feather gold rub-ons from Jenni Bowlin Studio!!


I was definitely inspired and guided by these pretty feathers to create this lay-out "Wish you the best".

Here is the kit I gathered to create this lay-out: papers from the Modern Mercantile collection, the feather gold rub-ons, the bottle stamp from this month’s kit, a white feather from Wired feather, alphabets, a pretty vintage badge Flatbacks and one of the newest Jenni Bowlin Studio punches.


I had fun using the Modern Mercantile papers: I chose the softest patterned ones for a very natural atmosphere. The „Mélange“ paper is used as background paper.

I cut zigzag shapes out of the „Sundries“ paper to give a dynamic note to my lay out.
The "Hodge Podge" paper will be glued under one of my pictures.


I glued two stretches of Jenni Bowlin Studio paper tape between two strips of paper. These two natural shades are really pretty!

Now let’s play with stamps! I stamped each pattern twice on a scrap paper with sepia Versafine.
I cut out two bottles and glued one on top of the other.
I applied the feather rub-ons on a white cardstock, and then cut them out with scissors. The edges are slightly curved to bring volume. The feathers are glued side by side next to my main picture.


I cut a little star with the Jenni Bowlin punch and added a „shape“ badge to finish the decoration. 
To add volume and softness, I had fun adding some white thread.

Now it’s time to add a title and some embellishments here and there.

Don’t forget the ink splashes as the finishing touch! And I also outlined the edges of all my patterned papers with a golden-tipped pen, as a reminder of the gold feathers.


I hope you liked my lay-out! See you next month!

Have a wonderful day!

Karine