

Wednesday, September 23, 2009

Monday, September 21, 2009
The Ranch with Stephanie Howell
 You don't want to miss any of the gorgeous details on this one. I especially love the heartfelt photography and the charming use of the scalloped border stickers and the subtle effect of the rub-on over the old book page and the diecut paper used as parenthesis and . . .
 Thanks for the inspiration Stephanie!
Friday, September 18, 2009
Hand Cut Titles with Lisa Dickinson
Hand Cut Titles in MicroSoft Word
by Lisa Dickinson
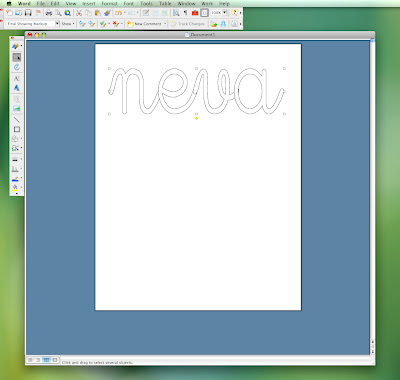 5. In the Drawing Toolbar (View > Toolbars > Drawing) select the Draw tool (the one with the box and letter A on top) and from the pull down menu select Rotate or Flip > Flip Horizontal. You resulting title will look like this:
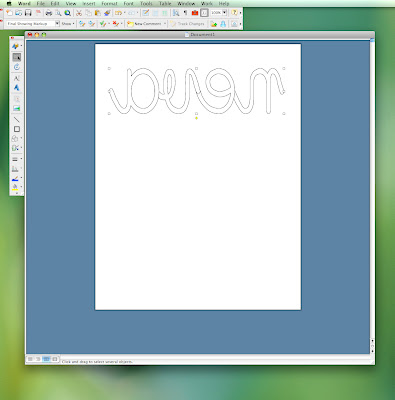 6. Click & drag the corners of the Word Art box to resize your title to the dimensions you want.
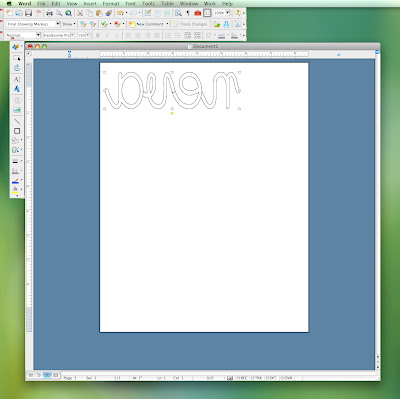 7. Print your document on the back (untextured side) of the cardstock of your choice.
by Lisa Dickinson
Have you ever run out of a letter while trying to spell a title with alphabet stickers? Or not had the ideal color stickers in your stash? Or maybe you needed a different font? When I find myself in that situation, I often opt to hand-cut a title from cardstock. I love my alphabet stickers, but sometimes a page needs a more custom title. And it's easy to design, print, and cut a title (really!)
Here's how to do it Word:
1. In a new Word document, add Word Art by selecting Insert > Picture > Word Art.
2. Select the outline option (top left corner of the menu box).
3. Type in the text for your title and select your font and size from the pull down menus. (I used the font Cursive Standard at a 96 pt. size for my example)
4. Click "OK"
5. In the Drawing Toolbar (View > Toolbars > Drawing) select the Draw tool (the one with the box and letter A on top) and from the pull down menu select Rotate or Flip > Flip Horizontal. You resulting title will look like this: 6. Click & drag the corners of the Word Art box to resize your title to the dimensions you want. 7. Print your document on the back (untextured side) of the cardstock of your choice.8. Using small scissors or an exacto knife, cut out the title. I'd recommend cutting out the space within letters (a,o,d,e, etc.) first.
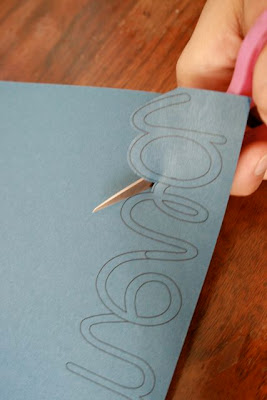 9. Flip your hand cut title over and apply it to your page.
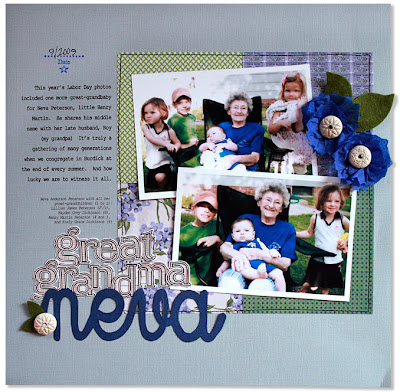 Page Supplies:
9. Flip your hand cut title over and apply it to your page.Page Supplies:cardstock (Bazzill Basics)
patterned paper, stickers, crepe paper, buttons, stamp (Jenni Bowlin Studio)
felt leaves (Jillibean Soup)
font (Courier - journaling; Cursive Standard, title)
Thanks for the inspiration Lisa!
Thursday, September 17, 2009
8 Favs at Eight with Celeste Smith
 Today's inspiration is brought to you by Celeste Smith. It's a fun and insightful layout of her son's eight favorite things as an eight year old. Thanks for the inspiration!
Wednesday, September 16, 2009
Mercantile Updates
 The September layouts just keep coming! Jenni loaded this elegant yet fun layout into her gallery this week. Swing over there to read her write-up. She always comes up with the best tips and shares the most delightful background bits.
You can also read more about what inspires her and her sense of style over at the Moxie Fab World Blog. AND there's a chance to win a complete set of the new silver and gold rub-ons! They're definitely worth a visit!
 Doris got an additional layout done as well. And she has another class coming up at Get It Scrapped! at the end of this month. Product Pizzazz 201: Details . . . you can check it out HERE!
Tuesday, September 15, 2009
The Farmer's Wife with Lisa M. Pace
Important Announcement! For your chance to win a complete set of the Townsquare line head over to the Paper Crafts Blog Moxie Fab World!
Lottie, the Farmer’s Wife
 Supplies Used:
Instructions:  • Using scissors or a craft knife and craft matte cut off the excess patterned paper
  • Apply rub on letters and the “&” as shown using Old School Mini Alphas – Brown onto the center of each Memo Pad square
• Cut a strip from the Red Star * Candy Drops patterned paper found in the Town Square Mini Papers pack. Using Aleene’s Paper Glaze attach the strip where the shirt and skirt meet.
 • Place two Self Adhesive Pearl Flowers – Cantaloupe down the center portion of the paper dolls shirts.
Lottie, the Farmer’s Wife
by: Lisa M. Pace
I’m thrilled to present to you Lottie, the farmer’s wife. With her quilted skirt and jewel adorned top Lottie makes living on the farm look quite easy. If you wish to create your own Lottie paper doll just follow the simple steps below. I plan on placing mine inside a simple rustic frame. Enjoy!
Supplies Used:Memo Note Book – Memo Pad * Brown
Old School Alpha Minis – Brown
Town Square Mini Papers
Bingo Cards Mini – Vintage
Crepe Paper Ribbon – Red
Self Adhesive Pearl Flowers
Pink Persimmon Stamp – Lottie
Brilliance Ink – Graphite Black
ColorBox Fluid Chalk Ink – Creamy Brown
Red & White Baker’s Twine
Aleene’s Paper Glaze
Tools Needed:
Tools Needed:
Paper TrimmerScissors
Decorative Scissors - Scallop
Tweezers
Rub on Tool
Sewing Needle
Liquid Adhesive
Sewing Machine and cream thread (optional)
Instructions:
• Print Dress Pattern PDF onto white cardstock, cut out.
• Apply a glue stick type adhesive to shirt portion of the dress pattern, attach a piece of patterned paper from the Town Square Mini Paper pack
• Using scissors or a craft knife and craft matte cut off the excess patterned paper• Using a paper trimmer cut 25 - ½ inch squares out of a piece of patterned paper from the Town Square Mini Papers, 30 – ½ inch squares out of a different patterned paper from Town Square Mini Papers and 27 – ½ inch Squares from a sheet of patterned paper from the Memo Note Book – Memo Pad * Brown
• Arrange all of the ½ inch squares to create the quilt pattern as shown onto the dress portion of the paper doll. Once the squares are arranged as you like pick up each square using tweezers, placed a small drop of Aleene’s Paper Glaze in the back center and place the square back into place. Note: I like to use Aleene’s Paper Glaze as it will not buckle my papers.
• Apply rub on letters and the “&” as shown using Old School Mini Alphas – Brown onto the center of each Memo Pad square• Using a sewing machine and cream thread stitch a small zig zag stitch over the vertical and horizontal sections between each square. Now stitch a straight stitch around the inside edge of the shirt. Note: This step is optional. I just like how it gives a finished quilted look.
• Cut a strip from the Red Star * Candy Drops patterned paper found in the Town Square Mini Papers pack. Using Aleene’s Paper Glaze attach the strip where the shirt and skirt meet.
• Ink around the edges of the entire dress using ColorBox Fluid Chalk Ink – Creamy Brown
• Cut strips of Red Crepe Paper Ribbon to the following links 12” from scallop edge, 6” and 2 to 2” in length from pinking edge. Using a sewing needle and embroidery floss begin gathering each piece of Crepe Paper Ribbon. Once each piece is gathered trim the edges for the neckline and sleeves using scallop scissors, spread gathered pieces out to the lengths of the skirt bottom, neckline and sleeves. Attach to back of dress using a strong liquid adhesive. Note: Any color embroidery floss will work as it will not be seen.
• Place two Self Adhesive Pearl Flowers – Cantaloupe down the center portion of the paper dolls shirts.• Cut the mini mini bingo cards from the back packaging section of the Vintage Mini Bingo Cards. Using a strong liquid adhesive attach 5 mini mini bingo cards to Red & White Baker’s Twine cut to approximately 9”, create and attach a bow from the same twine on each end of the mini banner

• Using the stamp set Lottie, stamp head, hands and legs onto a book page, cut out and attach to paper doll
• Using the stamp set Lottie, stamp head, hands and legs onto a book page, cut out and attach to paper doll
• Using a strong liquid adhesive attach the bingo banner to Lottie’s hands
Thanks for the inspiration Lisa!
Monday, September 14, 2009
Pioneer Days with Sharyn Tormanen
 I've had these photos sitting in my 'to scrapbook pile' since *sigh* 2006 (don't judge me). I've been on a two page layout role this past couple weeks, and I just knew when I saw this Jenni Bowlin paper, that it would work well with these pictures. I love how, while I used so many photos, the patterns don't take away from that, but support my theme. I can't wait to get to the next batch!
  The squares photos were punched with my large 2 1/2 inch square punch. I love how I was able to put that large pile of photos all on one page and not lose any of the mood or feeling in my prints with my crop.
Sharyn is a brilliant storyteller. To hear the story behind the story, have a good chuckle over the perils of scrapbooking, and see another great JBS layout head on over to her blog, Live from Tormville. Thanks for the inspiration Sharyn!

P.S. Check here for more JBS inspiration from Sharyn: American Girl Mini-Album
Subscribe to:
Posts (Atom)