Hi everyone! Harumi here.
Today I am sharing with you a card and a layout I made using the Christmas papers of JBS.
I repeated two pieces of paper which I cut in the form of the tree and stopped it with a stapler.
I made a layout with the same tree.
Happy creating!
Showing posts with label Christmas 2012. Show all posts
Sunday, December 22, 2013
Tuesday, December 18, 2012
Jingle All The Way
I have to be honest here, with Christmas only a week away I'm feeling a little overwhelmed by how many more preparations I've still got to go! So when it came to doing my Christmas cards I needed something quick and simple whilst still being eye-catching!
I think this set of 4 cards did the job perfectly. I've kept the same layout for each one, and I really haven't done anything too fancy or technique-y (with the exception perhaps of that origami Christmas tree)
Ok, and perhaps those origami stars as well....
But there are tonnes of tutorials out there for both of these techniques and once you learn them they are really easy to repeat over and over. I like to think of these things as tools in my tool-shed. You know... collect a few, and then just pull them out when you need them!
I don't know about you, but there's just something about Christmas crafts that makes me want to pour glitter over everything. Just about anything can be jazzed-up to look Christmassy with the addition of some sparkle don't you think?
But my absolute favourite card has got to be the dress-form that I turned into an angel with the addition of one of our famous JBS Cardstock feathers bent into the shape of wings. I think it just about works. Do you agree?!
So here's hoping you're all a bit more organised than me and not still working on your stash of Christmas cards. Although if you are, hopefully I've given you some ideas.
Merry Christmas
xx
Supplies:
I think this set of 4 cards did the job perfectly. I've kept the same layout for each one, and I really haven't done anything too fancy or technique-y (with the exception perhaps of that origami Christmas tree)
Ok, and perhaps those origami stars as well....
But there are tonnes of tutorials out there for both of these techniques and once you learn them they are really easy to repeat over and over. I like to think of these things as tools in my tool-shed. You know... collect a few, and then just pull them out when you need them!
I don't know about you, but there's just something about Christmas crafts that makes me want to pour glitter over everything. Just about anything can be jazzed-up to look Christmassy with the addition of some sparkle don't you think?
But my absolute favourite card has got to be the dress-form that I turned into an angel with the addition of one of our famous JBS Cardstock feathers bent into the shape of wings. I think it just about works. Do you agree?!
So here's hoping you're all a bit more organised than me and not still working on your stash of Christmas cards. Although if you are, hopefully I've given you some ideas.
Merry Christmas
xx
Supplies:
Labels:
cards,
Christmas 2012,
Natalie Elphinstone
Wednesday, December 12, 2012
Christmas gifts and more~
Hi everyone~Connie here with some quick and easy gift ideas. These do not take much time to make at all~so the good news, you still have time to craft!!!!
I used the super cute Silhouette mini deck of cards, to hold my lapel pin. It is put together using the doily flowers {one of my faves}, old buttons, {JBS buttons} and a lapel pin set.
This is how the back looks! I hot glued most of it!!! The next project~

I bought these adding machine key pieces from Jenni when I met her in Austin. All I did was use a JBS button and hot glued a tack to the back of it~ like this.
The packaging is a re-purposed container that I covered with JBS Christmas 2012 paper, and tied it up with twine and super cute!! I'm thinkin' I'm gonna put my name on this one:):):)
Next up~
I used the Silhouette mini deck and the tag paper and made some gift tags or they look pretty cute on the tree!! I added some trim and the JBS chipboard buttons also.
This one is for all you junkers' out there like me~old door knob {I added inka-gold to the knob to make it shine}, wire~ heavy is all I can tell you, ribbon and JBS stickers, button and Christmas chipboard button. Once the wire is twisted and put through the JBS button holes, hot glue it in the center hole of the door knob.
The last project took the longest, but you still have time:):):) really, not that long!!!!
On these Christmas trees you need the Tim Holtz rosette dies or snowflake die and some cool JBS paper. I used Wren for these!! The embellishments are all JBS!!! I have enjoyed sharing these holiday projects with you and wish you and yours a very merry happy holiday!!
by~C. Mercer
Labels:
buttons,
chipboard,
christmas,
Christmas 2012,
Connie,
doily flowers,
mini deck,
tags,
wren
Tuesday, December 11, 2012
Christmas Mobile by Harumi
I have made a Christmas mobile with the most recent JBS Christmas Collection.
It is hung from the ceiling with thread and wire, swings and is very lovely.
I enjoyed making very much! Happy scrapping!
Supply List:
Christmas 2012 Accessory Sheet
Christmas 2012 6
Tuesday, November 27, 2012
Ho, Ho, Ho, and a little Merry!
Hi everybody! Tina here today with my first Jenni Bowlin Studio’s project and post! I am so excited to be able to share this with you today and I hope you enjoy it!
Can you believe Christmas is less than a month away? It really doesn’t seem possible at all. It just seems like yesterday I was wearing sandals and shorts. But, since December and Christmas are SO close, I thought it would be fun to create a little holiday home décor project for you.
One of my favorite crafty pastimes is creating fast and simple home decorations with my scrappy supplies.
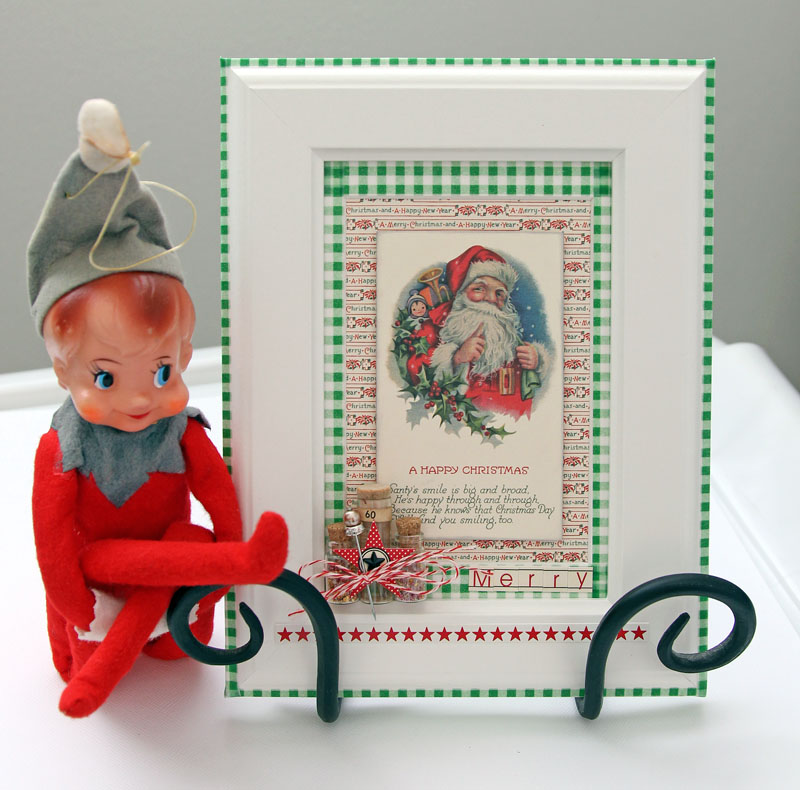
When I create home decorations, I like to start with a simple frame that can be embellished to adjust to the season. I embellished my frame by adhering several strips of washi tape around the edges. Isn’t that a super quick and great look?
I removed the glass from the frame and ‘backed’ my wall art with paper from the Christmas 2012 collection. I then cut a section from the Assessory Sheet, inked the edges and adhered with foam strips. Adding a little dimension with pop dots or foam squares adds a big impact with such a small detail.
I filled 3 medicine vials with glitter and tied them together with twine.
Supply List:
Paper:
Other:
Thank you for letting me share my Merry Christmas frame with you today. Have a great week!
Monday, November 26, 2012
The Perfect Christmas?
Hey everyone! It's Jenni Hufford here and I am so happy to be sharing a Christmas Memories layout with you today!!
Last Christmas one of my favorite memories was watching my children and their cousins bake Christmas cookies. It was a few days before Christmas and we decided to get together spontaneously to bake and decorate Christmas cookies. If you are anything like me, those last few days before Christmas are sheer CHAOS. That is about the time that perfectionism begins to creep into my heart and I become overly concerned and focused on "creating the perfect Christmas" for my family.
The older I get, the more I begin realize there is no "perfect" Christmas!! This afternoon while the kids baked Christmas cookies was the perfect reminder to me. As they were loading a mountain of red hots, peppermints, icing, candy canes on their cookies, I realized they were not worried about making "perfect" cookies, instead, they were just enjoying the process and the fact that they were together. I need to be more like that and refocus on the true meaning of Christmas.
In order to create this layout, I started with Jenni Bowlin's Perf Marks Clear Stamp to create a grid on white card stock. I then added the bottom tags from the Christmas 2012 accessory sheet with two wallet sized photos. I then added bits and pieces of Jenni Bowlin accessories, and square punched pattern paper inside the grid.
Thanks so much for joining me today!
Last Christmas one of my favorite memories was watching my children and their cousins bake Christmas cookies. It was a few days before Christmas and we decided to get together spontaneously to bake and decorate Christmas cookies. If you are anything like me, those last few days before Christmas are sheer CHAOS. That is about the time that perfectionism begins to creep into my heart and I become overly concerned and focused on "creating the perfect Christmas" for my family.
The older I get, the more I begin realize there is no "perfect" Christmas!! This afternoon while the kids baked Christmas cookies was the perfect reminder to me. As they were loading a mountain of red hots, peppermints, icing, candy canes on their cookies, I realized they were not worried about making "perfect" cookies, instead, they were just enjoying the process and the fact that they were together. I need to be more like that and refocus on the true meaning of Christmas.
In order to create this layout, I started with Jenni Bowlin's Perf Marks Clear Stamp to create a grid on white card stock. I then added the bottom tags from the Christmas 2012 accessory sheet with two wallet sized photos. I then added bits and pieces of Jenni Bowlin accessories, and square punched pattern paper inside the grid.
Thanks so much for joining me today!
Friday, November 23, 2012
Coca-Cola Santa Memories
Hey everyone!! Corrie here today with one of my Christmas memories!
Now that Thanksgiving has happened, my attention has turned to really focusing on Christmas. The radio has been fixed to 24-7 Christmas music, the inside of the house is getting decorated, and with much groaning from my hubby, the outdoor lights are ready too. I love Christmas time.
As my sisters and I have gotten older and had families of our own, my mom has shared some of the decorations we grew up with. It is cool to have stuff up that I always remember being there. One of the coolest Christmas decorations we had was a stuffed Coca-Cola Santa. I did not realize how old he actually was until I pulled out this picture, which was dated 1977. I was not yet 2 years old.
So the Santa is at least as old as me. Crazy. Back in 1977 he was holding a small bottle of Coca-Cola too. That has been lost for years now.
And the Santa on this card I cut out of one of the sheets of paper totally reminds me of my Coca-Cola Santa.
So, I must admit, I love this Santa very much, but I do not have him. I am not really sure how my sister ended up with him, but she did. I only see him in the pictures she send of her kids with him now. At least he is still being loved on because he really is very cool.
Have some very Happy Holidays all!!
~ Corrie
Now that Thanksgiving has happened, my attention has turned to really focusing on Christmas. The radio has been fixed to 24-7 Christmas music, the inside of the house is getting decorated, and with much groaning from my hubby, the outdoor lights are ready too. I love Christmas time.
As my sisters and I have gotten older and had families of our own, my mom has shared some of the decorations we grew up with. It is cool to have stuff up that I always remember being there. One of the coolest Christmas decorations we had was a stuffed Coca-Cola Santa. I did not realize how old he actually was until I pulled out this picture, which was dated 1977. I was not yet 2 years old.
So the Santa is at least as old as me. Crazy. Back in 1977 he was holding a small bottle of Coca-Cola too. That has been lost for years now.
I used the new Jenni Bowlin Christmas paper, some of her awesome vintage buttons, the bling stars, skinny alphas, and the quilting chipboard pieces along with a little Seed Packet paint dabber.
And the Santa on this card I cut out of one of the sheets of paper totally reminds me of my Coca-Cola Santa.
So, I must admit, I love this Santa very much, but I do not have him. I am not really sure how my sister ended up with him, but she did. I only see him in the pictures she send of her kids with him now. At least he is still being loved on because he really is very cool.
Have some very Happy Holidays all!!
~ Corrie
Thursday, November 22, 2012
It's the Most Wonderful Time of the Year
Hi JBS fans! It's Natalie here today sharing some of my Christmas Memories.
I don't know about you but I've been truly inspired by all the Christmas craft projects that the DT and Ambassadors have been bringing you over the past few weeks. So many fabulous ideas for cards and tags and gifts and home deco! If you've missed any of it then it's definitely worth your while scrolling back through.
But for the coming week we're going to turn our attention back to our more traditional craft form... the layout ;-)
There's something magical about watching the joy on my daughter's faces as they open their presents on Christmas morning, and I was so happy to be able to capture this moment. But because they're still dressed in their (blue and purple) pajamas in the photo I wanted to balance that out in the colours I chose to scrap with. So along with the traditional green and red I included some grey and blue too. I've decided I quite like the combination!
I used a mixture of non-Christmas products (like the Bank Statement paper I used as my base, and the Printed Pocket I hid my journaling in) along with some of the new Christmas collection (like my favourite Christmas Ribbon paper). And personally I believe no Christmas layout is complete without a touch of sparkle so I covered some chipboard stars with silver glass glitter and scattered them across my page as my embellishments.
After Christmas I generally move on, so I've got all of my photos from last year still to scrap. What about you, what Christmas Memories have you got to scrap about?
I don't know about you but I've been truly inspired by all the Christmas craft projects that the DT and Ambassadors have been bringing you over the past few weeks. So many fabulous ideas for cards and tags and gifts and home deco! If you've missed any of it then it's definitely worth your while scrolling back through.
But for the coming week we're going to turn our attention back to our more traditional craft form... the layout ;-)
There's something magical about watching the joy on my daughter's faces as they open their presents on Christmas morning, and I was so happy to be able to capture this moment. But because they're still dressed in their (blue and purple) pajamas in the photo I wanted to balance that out in the colours I chose to scrap with. So along with the traditional green and red I included some grey and blue too. I've decided I quite like the combination!
I used a mixture of non-Christmas products (like the Bank Statement paper I used as my base, and the Printed Pocket I hid my journaling in) along with some of the new Christmas collection (like my favourite Christmas Ribbon paper). And personally I believe no Christmas layout is complete without a touch of sparkle so I covered some chipboard stars with silver glass glitter and scattered them across my page as my embellishments.
After Christmas I generally move on, so I've got all of my photos from last year still to scrap. What about you, what Christmas Memories have you got to scrap about?
Labels:
chipboard,
christmas,
Christmas 2012,
Natalie Elphinstone
Subscribe to:
Posts (Atom)