Tuesday, August 31, 2010

Vintage Canvas by Dina Wakley

My mom recently gave me some photographs of my grandmother that were new to me. There are very few photographs of her, so seeing these "new" photographs has been a wonderful experience. They're all from the late 30s and early 40s, and it is so fun for me to look at the photos and remember my sweet grandmother.

I made this canvas with one of those photographs. It's my grandmother and my mom's two oldest brothers in 1942. To create the canvas, I first applied some molding paste to the corners and let it dry. Then I added some ink and acrylic paint to make the colored background. Jenni's daubers work great as a distress tool--rub the paint into the cracks and crevices for a cool effect. Then I added a JBS chipboard heart (covered with JBS mini paper, of course), and some other little paper accents that I cut from a combination of Jenni's mini and full-size papers. To add contrast against the yellow/orange background, I added some blue paint splatter (blue and orange are opposite on the color wheel, so when you use them together you get high contrast and visual interest).
Thanks for peeking at my sweet grandmother and this little canvas to honor her! Dina
Pin It!

Sunday, August 29, 2010

Tigers by Wilna Furstenberg

Our family is in a season of change. And today I decided to make a page about it. It will be a good reference one day when we look back at this exciting time! I want to challenge you today to not only scrapbook the good times but also the times of change in your life!
Love, Wilna

Brilliant! Thanks for the inspiration Wilna!
Pin It!

Thursday, August 26, 2010

Welcome September's Guest Jamie Waters!

My name is Jamie Waters, I live in So Cal with my family of 6. I take pictures, I play with paper and I love to eat good food :)

I love this picture because my husband took it of me. We were in Hawaii a few weeks ago for a wedding, I was in an accident and we just had one day to soak up the Hawaiian goodness before we headed back home to craziness. We lounged around the north shore, drove around from beach to beach, ate from food truck to food truck. I will remember this day as the pinnacle of our trip :)

Here is a little sample of the scrappy goodness Jamie has in store for you this month. Can't wait to share the rest!
Pin It!

Wednesday, August 25, 2010

JBS Mercantile September Peeks!

I spy exclusive stickers on Lisa's layout!

I spy some Family Tree on Keisha's Layout!

I spy some add-on action on Doris's layout!

I spy some Halloween happiness on Jenni's layout!
Only six days till the big reveal! Are you ready? :)
Pin It!

Tuesday, August 24, 2010

Breaking News!

We're sharing an early sneak peek of our September kit to give you some breaking news hot off the press! A new ebook is now available from Ella Publishing "Ella's Essential Guide to Scrapbooking Girls" featuring one of our own, Danielle Flanders!

If you like this one you might also check out ebooks from our other designers, "Design Workshop" with Lisa Dickinson and "Time to Scrapbook" featuring Jenni Bowlin and Shimelle Laine. All these ebooks have great sneak peeks of their own, so check them out!
Pin It!

Button Thanks Card by Danielle Flanders

I really love the dimension these beautiful buttons give a card! You can create a warm, cozy card with a monochromatic feel with just a few textural items. Here's how:

1. Create a card base from white cardstock.
2. Apply silver rub-on to cream cardstock. Trim to fit on card front. Round corners and ink edges. Wrap thick twine around and tie in knot. Adhere to card base. Adhere two pearls in right hand corner.
3. Thread twine into buttons. Adhere buttons to journaling card.
4. Attach flower and stick pins. Adhere rub-on saying.
5. Adhere finished journaling card with pop dots.

Jenni Bowlin supplies used: Silver Photographer's Mark Rub-on, Cream Vintage Style Sew-On Buttons, Shell Antique Stick Pins, Farmer's Wife Journaling Cards Other supplies: cream and white cardstock, twine, thanks rub-on and pearls (Melissa Francis), Fairy Tale Roses (Prima), Distress Ink (Tim Holtz)

Lovely! Thanks for the inspiration Danielle!
Pin It!

Monday, August 23, 2010

Tree Canvas by Cheryl Ametewee

Lately I haven't been able to watch too much TV...having 2 babies and a business to run has been taking up all of my time...and I have to admit that I've missed it a little bit. Which is why I have taken up stitching some of my projects. Because if I'm sitting on the couch doing nothing with my hands I tend to drive myself crazy by listing off in my head all the things that I need to get done. But if I'm stitching while watching all my favorite shows, I can sort of bill it as a business expense and relax. :) Which is why today's post is about stitching. For this particular project I wanted to make a little one-of-a-kind canvas to go above Gracie's bed. So to start out, I just made the tree out of the brown polka-dot paper from JBS, and then for the leaves I glued on little handcut leaves using fabric from an old shirt of mine that I'm incorporating into all the projects for her little space.*NOTE: I used the Helmar Craft Glue for the paper to canvas/fabric to canvas details and it worked amazingly! I loved that I was able to move around the pieces a bit before it really stuck. Once I had the basic design figured out, I simply stitched over the paper and fabric with embossing thread to give it a more finished look. And then when I was finished stitching the tree and leaves, I created a little bird's nest out of vintage trim by folding it over and over until it looked like a nest...and then to make it look even more like one I first dabbed some of the new (FABULOUS!) JBS brown paint and then stitched a criss/crossing pattern on the bottom. Then I used rubons to add little birdies to the nest...which I used as a guide to stitch around.The last thing that I did was add 3 pink butterflies, sewing them down the middle to hold them in place.

And it was just that simple...even though the stitching took a couple hours, it was nice to have an excuse to sit on the couch AND create for once!
:)xoxo, cheryl

Pin It!

Sunday, August 22, 2010

Thoughts from our August Guest Kara Haupt

My name is Kara Haupt and I'm 18 years old. I'm moving to Brooklyn, NY to attend art school for photography this fall. I'm not good at focusing and I'm highly amused by Disney channel TV shows. I've been scrapbooking since I was 15. I love dark chocolate, weird movies, and my silly friends.

My blog: karahaupt.typepad.com
Twitter: twitter.com/karahaupt

I'm a little bummed that I won't have all my scrapbooking supplies with me at school, but I'm pretty sure all the inspiration I'm going to get here will make up for it. I've always been accustomed to working in a small space and have had most of my supplies slid under my bed in a plastic bin for years. I pull out the bins and scrapbook right on the floor with all of my supplies right before me. I've never scrapbooked on a chair before and I don't know I'd like it if I did! :)

I love having all of my tiny paper doo-dads right before me. It's all the tiny embellishments that inspire me the most!

I love this layout because it really epitomizes the relationship I have with my best friend Stephanie. She read it after I made it and said "that is so true". Haha! Visually I love it because it has the loveliest autumn colors. I also like how the old check is cut up. Breaks up the design, but also carries it throughout the page.
Pin It!

Friday, August 20, 2010

Big Picture Scrapbooking Giveaway!

We are hosting a giveaway for the Big Idea Festival at Big Picture Scrapbooking! There are also new projects from Lisa Dickinson and Doris Sander (only the detail shots are shown here, you have to click on over to BPS to see the big picture). Hurry over!!!


Pin It!

September Exclusives!

Here are the exclusives you can look forward to in the September Papercrafting Kit!
Pin It!

Thursday, August 19, 2010

A Good Day from Becky Novacek

This layout was so amazing in my mind. But there are times when an idea doesn't translate the way you think it will! Especially when a sewing machine (and me) is involved in the process. My sewing machine decided to mess up as I carefully placed my layout in it's path. So sad. However, I couldn't bear to start over completely, so I decided to work with what I had. It turns out that with my love of all things well loved and worn, even a messed up sewing machine didn't stop me from making this layout work! I simply took the original titlework letters off, topped the messy stitching with string and handcut new letters.

My original idea was to share how much I love to mix and match bits and pieces of pattern paper and embellishments that weren't necessarily meant to be used together. That still applies, but I think the lesson in this process for me had much more to do with making even what appears to be a big mistake into something that you end up liking. I dare you to take a layout that normally would have ended up in the trash into something you like!
Sweetness! Thanks for the inspiration Becky!
Pin It!

Wednesday, August 18, 2010

Rub-on Tip from Ranjini Malhotra

One thing I love about Jenni's rubons is how easy they are to use - they go on like butter. I used the silver damask background rub-on single to make this card. This is how I created the white space that forms the heart in the center of the card:

1) Use a chipboard shape of your choice. I used one of Jenni's chipboard hearts.

2) Carefully peel the rub on up from the background and slowly slide the chipboard heart onto the backing sheet, being careful not to allow the rubon to touch the chipboard until you have it centered exactly where you want it (in this case - I placed the chipboard right on the center of the backing sheet).
3) Apply the rubon ONLY to the chipboard heart, being careful not to apply pressure directly onto the backing sheet.
4) When you are sure the rubon has transferred only to the chipboard, carefully lift the backing sheet up, using a craft knife if needed to trim the rough edges around the heart. You can set the heart aside to use in another project.
5) Now you should have a heart shaped space on the rubon sheet with the damask background surrounding the heart.
6) Place the damask background on a white cardstock and apply to create the background of your wedding card.
7) Embellish with a photo, a bit of bling, and a penciled sentiment, and voila, you have a quick and beautiful card!

You can try this with any of the background and any chipboard shape that will fit under the rubon sheet.

Gorgeous! and such a clever idea! Thanks for the inspiration Ranjini!
Pin It!

Tuesday, August 17, 2010

Hidden Gardens by Shimelle Laine


I love mixing a little bit from different JBS paper collections. They all work so well together! The papers here come from Baby of Mine (pink/red dot), Homespun (green check), Vintage Black (ledger) and Playdate (red and yellow florals). The journaling blocks are JBS die-cut cards - one relatively new and one from a much older collection - and there's also a label sticker and some bingo letters in there!

I love how the antique shading of the ledger paper works perfectly with photos that have a vintage treatment.


Fabulous! Thanks for the inspiraton Shimelle!
Pin It!

Monday, August 16, 2010

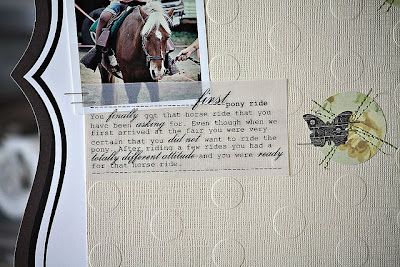
Pony Ride by Keisha Campbell

I just love JBS die cut papers, embossed cardstock and a bit of pattern paper...and of course a few butterflies. I just wish I wasn't such a hoarder! The embossed dot paper is simply cream-but looks dingy onscreen for some reason, sorry.


Beautiful! Thanks for the inspiration Keisha!
Pin It!

Sunday, August 15, 2010

August Mid-Month Release!

It's mid-month release time! Today in the General Store we have available a restock of the vintage glove molds under Vintage Finds and random retired chipboard pieces and four of Jenni's retired class kits under Mid-Month Releases. There are also still a handful of the August Project and Add-On kits under Monthly Kits. While supplies last . . .


Pin It!

Saturday, August 14, 2010

Kit Bits with Amanda Johnson

"It never fails. After each month of making layouts from the JBS Mercantile kits, I have so many goodies left over! It's fun to take the leftover papers and bits and mix it up with items from my stash- letters I've been hanging onto for years, and leftovers from past kits. Here are three layouts I created using the July JBS Mercantile kit and letter stickers from my stash."


Pin It!

Thursday, August 12, 2010

Embellished Frame by Betsy Sammarco

My dear niece’s birthday is coming up soon and I wanted part of my gift to be homemade. My nieces so appreciate and love homemade gifts! I had this simple frame from Pottery Barn, inserted one adorable photo, and embellished it with a festive beach banner! The Beach Bingo Cards are one of my all time favorite Jenni products. I just love their soft aqua color.

Supplies used:
Beach Bingo Cards, Butterfly banner stickers, patterned paper from the Playdate line, JBS Vintage Brights Core’dinations cardstock, Crepe Paper Ribbon, Chipboard buttons, seam binding, and a chandelier crystal. The banner is adhered to the outside of the frame with Helmar Scrapdots.

Charming! Thanks for the inspiration Betsy!
Pin It!

Just One More . . .

I think there may be another "Just one more . . . " or even two or three "Just one more . . . "s. It's just too hard to say good-bye to this fabulous kit! Good thing another new and fabulous kit is coming soon! In the meantime, thanks for the inspiration Becky!
Pin It!

Wednesday, August 11, 2010

Tuesday, August 10, 2010

August Gallery Updates: Oh the Cuteness!

If you didn't snatch up the August Project Kit you definitely should. The last few won't last long after everyone sees the cuteness that the design team has created with it. All the large soda caps and vintage children photos are from the August Project Kit. So for gallery updates we have . . .

These charming cupcake stands plus a mini journal and two more layouts from Kerry Lynn . . .

A tiny mini abum from Doris . . .

An adorable card and layout from Danielle . . .

A delightfully spooky Halloween card and project from Ranjini . . .

Three more layouts from Keisha . . .

Two more layouts from Michelle . . .

P.S. The Main kit is sold out at this time. We do still have a handfull of the August Add-on which contains the sweet vintage flower seed packet pictures you see on some of the layouts here.
Pin It!