Showing posts with label layout. Show all posts

Friday, June 13, 2014

Summer Scrapping: Circles & Squares

We're celebrating all things summer this month at JBS, and I couldn't be happier! I love the bright colors and fun themes that accompany warm weather scrapping. Today I'm mixing some pieces from the June Mercantile Kits (Papercrafting and Historian - both of which are still available!) with Modern Mercantile papers and wood veneer. In addition, I'm combining rectangles and circles for a fun, energetic look.

I snapped this shot of Riely and her best friend Cassidy a few weeks ago on the last day of school. They were excitedly discussing all their big plans for summer, which included lots of playdates, sleepovers, and attending theater camp together.


S U P P L I E S :


For the base layer, I used the Plus One stencil and some acrylic paint to add a bit of color and texture to my cardstock.  Then I layered some paper scraps and journaling cards to form a loose grid around the photo.


The heart on one of the journaling cards was a perfect place to type in a bit of journaling. Then, to add a sense of motion and energy to the page, I cut some thin circles from coordinating cardstock as well as cutting out a circular title for my page. I arranged these three circular elements in a triangle around my photo. Both the circles and the rounded corners on the papers and photo help to soften all the straight lines and add a "flow" to the page.


A few simple embellishments - a sticker, a vintage ticket, and wooden buttons (that also relate to the circles!) are all I needed to finish this page.

The combination of circles and squares can work with so many summer page themes, from baseball to beach balls, bike riding to frisbee games, pizza parties to road trips! Together they can help you create a dynamic, lively page to tell all your summer stories.

Happy Scrapping!


Pin It!

Friday, May 30, 2014

Getting messy with paint and rub ons

I love that this month we are spending the time getting messy.  There are so many fun things to play with and get messy on a scrapbook layout.  My favorite things!!  Gesso, paint, mist, ink, and rub ons all are perfect messy supplies.  These products are the best for me to use to really create a page that feels like my page.


For this page about my daughter being 16 (how did that happen???) I started by covering the background with gesso.  This is a great way to create a stronger paper base.  I then combined gesso and Speckled Egg paint from the paint dauber and brushed it down the page.  I used washi tape, some sprinkled ink, rub ons and sequins to finish off the background.


Everything else is a fun embellishment.  Plenty of reminders that she is sixteen.

I hope you play with paints and rub ons and really allow yourself to try some messy techniques.

~ Corrie
Pin It!

Tuesday, May 20, 2014

getting messy in the studio with ink bubbles


I had so much fun stepping into the studio space with our boys to play around a bit and make this piece. It reminded me of some of the fun things I did when I was in grade school - and also took me to a place where I was having fun and experimenting with my artwork - something that I've been working on doing in the classes I'm taking. I also added a bit of free motion stitching on top of the bubbles, but ended up covering all but just a bit of that with my layout pieces...

Here's how we made the bubbles:


Add water and concentrated ink (reinker for ink pads) or paint to a plate, and then add just a drop of dish detergent.


Using a straw, blow bubbles until you get a whole pile of them.


Once you have a whole bunch, gently lay your paper on top. It may take a few tries to get the right amount of ink bubbles on your paper.


Either allow your paper to dry on it's own, or apply a heat gun to dry out the ink.


This created a random, soft and subtle background for my layout piece. If you use paint, the effect will be must stronger...


I then added my random free motion stitching on top of my ink bubbles.


I finished by adding my embellishments on top...

Have fun getting messy!

~ Leah
Pin It!

Monday, April 14, 2014

New Product Focus: Wood Veneer & Sequins

I am loving all the new wood veneer designs and sparkly sequins in the newest JBS release! I knew they'd be the perfect embellishments for a page about our recent trip to Mexico, so I gathered up my favorites and got to work!


To create a beachy feel on the background, I lightly brushed it with Speckled Egg ink that I watered down.  Once it was dry, I used the Plus One Stencil with aqua acrylic paint and added some of the cross-hatch texture over the top.  I then cleaned out the stencil and used it again with a teal fine-tip marker to trace additional plus-signs around the painted areas.


I layered a few paper scraps down the center of the page and then arranged my wood frames vertically as well. I sized my four photos to fit inside the Insta-Frames, which will perfectly hold 2x2-inch prints. Adhering them with foam dots helps to pop them up off the wood a bit.


I used the Speech Bubbles stencil to trace shapes onto white cardstock. Then I cut them out with small scissors and used them to hold my journaling strips (also brushed with water down Speckled Egg ink.)


Finally, I sprinkled several of the wood veneer clouds, clear sequins, and flower sequins around the page. They add the ideal finishing touch to this vacation page!

The wood veneers, stencils, and sequins are now available online and in scrapbook stores. We'd love to see what your create with them!

Happy Scrapping!


Pin It!

Wednesday, October 30, 2013

leafy layout..

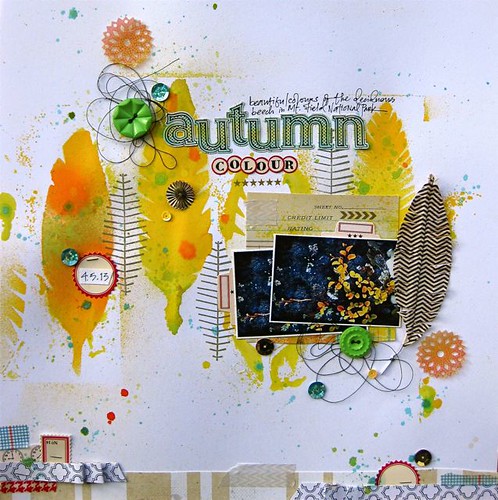
Hi, Gina here sharing a Fall layout with you today..I love to get outdoors here in Australia and photograph the gorgeous Autumn leaves..so I've used them as my inspiration for this layout..

autumn colour

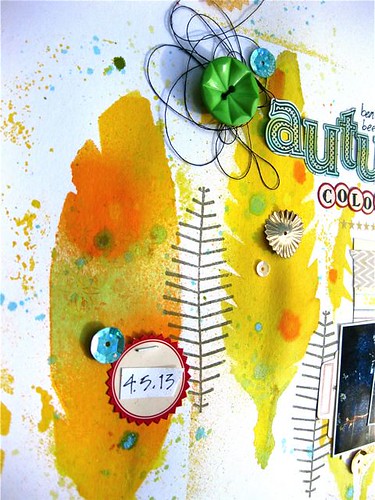
I've used the graphic leaf stencil and lots of bright mists to replicate the leaves in the photo..then stamped in between each leaf with the exclusive graphic feather..

the classic tiny dot alphabet stickers used in the title ink can be coloured easily with ink, and I've used a blue-green combination here..

IMG_0250

adding also a scattering of bright green vintage buttons and sequins including the pot of gold and doily assortment..  Once again I've used a feather as a substitute for a leaf with a cardstock feather 

The border at the bottom of the page is made with layers of paper off-cuts, some stickers and paper tapes

IMG_0230

Thanks for stopping by and don't forget to share your Autumn/Fall layouts in the JBS gallery! xx


Pin It!

Tuesday, October 8, 2013

October Kits: Papercrafting & Historian

The October kits here at Jenni Bowlin are wonderfully warm with gorgeous colors and patterns. It was a great way to lighten the last dreary day we had at our summer beach trip.


For this project, I mixed the papercrafting kit...


And the historian kit...


Both are definitely for October in colors and theme, but still so versatile they can be used on any page!

Here are some details.  I love the kraft speech bubbles.


Make sure to snag of these awesome kits before they are gone!
Pin It!