Showing posts with label blue. Show all posts

Monday, April 14, 2014

New Product Focus: Wood Veneer & Sequins

I am loving all the new wood veneer designs and sparkly sequins in the newest JBS release! I knew they'd be the perfect embellishments for a page about our recent trip to Mexico, so I gathered up my favorites and got to work!


To create a beachy feel on the background, I lightly brushed it with Speckled Egg ink that I watered down.  Once it was dry, I used the Plus One Stencil with aqua acrylic paint and added some of the cross-hatch texture over the top.  I then cleaned out the stencil and used it again with a teal fine-tip marker to trace additional plus-signs around the painted areas.


I layered a few paper scraps down the center of the page and then arranged my wood frames vertically as well. I sized my four photos to fit inside the Insta-Frames, which will perfectly hold 2x2-inch prints. Adhering them with foam dots helps to pop them up off the wood a bit.


I used the Speech Bubbles stencil to trace shapes onto white cardstock. Then I cut them out with small scissors and used them to hold my journaling strips (also brushed with water down Speckled Egg ink.)


Finally, I sprinkled several of the wood veneer clouds, clear sequins, and flower sequins around the page. They add the ideal finishing touch to this vacation page!

The wood veneers, stencils, and sequins are now available online and in scrapbook stores. We'd love to see what your create with them!

Happy Scrapping!



Pin It!

Tuesday, April 16, 2013

Scrapbooking with Washi Tape- The Golidlocks Technique


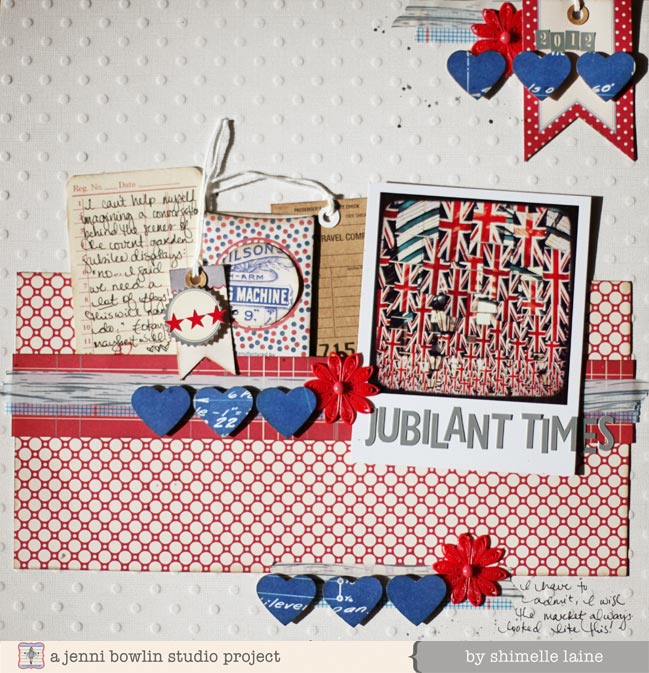
I am delighted that Jenni has added washi tape to her line of scrapbooking products, and of course her tapes are patterned with classic designs that will mix and match with ease.  I wouldn't expect anything less!  But this is extra brilliant considering a roll of washi tape - even used frequently - can last a long while.  All of the JBS tapes are great designs for that long-term use, and you'll never have to worry that they will go out of style.


If you're starting to collect washi more than you use it, try a trick for letting it help you embellish a page design.  Pick two tapes that work together for your page, and use three strips of each: one long, one short, and one in between.  Perhaps we should call this the Goldilocks Washi Technique!


Placing these three pairs of tapes on your layout then makes it easy to embellish things for a design that will always work.  I used the blue grid and whitewashed woodgrain tapes, and my smallest set is up at the top right corner, the longest across the middle of the page, and the middle set at the bottom.  Then it's just a case of choosing some embellishments you can repeat in those three locations, so I used a heart punch with the lovely blueprint paper from the Wren collection and a red doily.  Placing those three groups of embellishments and my photo first made it easy to finish the rest of the page because the placement was obvious: all that space to the left of the photo!  So that became a great place for journaling and some tags.  Of course, for a multi-photo page, you could easily replace some of the tags with additional pictures.  By keeping the three sets of tapes all on the horizontal and using them to anchor those repeated embellishments, the rest of the page comes together without worry.  Give it a try!


If you fancy more inspiration for your JBS washi tapes (and more red, white, and blue JBS goodness!), I have another project to share with you on my blog.  You can find this project here, designed as the facing page in my album.  These two pages aren't a double page spread in the strictest sense, but they have enough in common to certainly coordinate side by side.  


Pin It!