Showing posts with label halloween. Show all posts
Thursday, October 9, 2014
october crafted kit - diy fabric heirloom pumpkins
Inspired by the dusky, cool tones of heirloom pumpkins , these pumpkins will add the perfect touch of whimsy to your mantel or shelf this year. And, I have to admit, they were pretty fun to make.
The October crafted kit comes with everything you need to create these three stuffed fabric pumpkins.
The kit also comes with complete instructions including full color photos for each step! I hope you enjoy them as much as I do!
~ Leah
Labels:
autumn,
crafted kit,
fall,
halloween,
JBS Mercantile October Crafted Kit,
leah
Thursday, October 31, 2013
The Things Kids Say
Halloween is one of my Favorite holidays. The October JBS Mercantile kits managed to capture everything that embodies the holiday and the season. I have been so inspired to pull out older Halloween photos in order to get them scrapped. Most of the photos include the typical Halloween costumes and Trick or Treat candies. However, I had one set of photos that certainly didn't fit in that typical category.
Most years, my son wore his costume as soon as we acquired it. By the time Halloween would come around, it would be well worn and loved. This time, he decided the costume he had chosen was't particularly comfortable. He wouldn't pose for a decent photo. In fact, the wig was off before he even started down the driveway. He was supposed to be Yu-Gi-Yoh but without the wig, many grown ups assumed he was Sgt. Pepper from the Beetles' song. This caused my son to proclaim at each and every house that he was not Sgt. Pepper. Just like that, a scrapbook page title had been born.
I wanted supplies that embodied both his statement and the fun atmosphere of Trick or Treating. I chose most of my supplies from the October Mini Album kit. I loved the bold traditional colors mixed with the playful patterns. The mini album pages were easy to layer into the layout and provided ample space for journaling.
I added in a few of the Halloween Bingo Cards along with some sparkly buttons and enamel dots from the Artisian kit. Using the pre-cut elements of the mini album kit was a real time saver for me.
The things kids say can help change an ordinary event into something unique. Have your kids said something especially memorable about Halloween or Fall?
Christy
Most years, my son wore his costume as soon as we acquired it. By the time Halloween would come around, it would be well worn and loved. This time, he decided the costume he had chosen was't particularly comfortable. He wouldn't pose for a decent photo. In fact, the wig was off before he even started down the driveway. He was supposed to be Yu-Gi-Yoh but without the wig, many grown ups assumed he was Sgt. Pepper from the Beetles' song. This caused my son to proclaim at each and every house that he was not Sgt. Pepper. Just like that, a scrapbook page title had been born.
I wanted supplies that embodied both his statement and the fun atmosphere of Trick or Treating. I chose most of my supplies from the October Mini Album kit. I loved the bold traditional colors mixed with the playful patterns. The mini album pages were easy to layer into the layout and provided ample space for journaling.
I added in a few of the Halloween Bingo Cards along with some sparkly buttons and enamel dots from the Artisian kit. Using the pre-cut elements of the mini album kit was a real time saver for me.
The things kids say can help change an ordinary event into something unique. Have your kids said something especially memorable about Halloween or Fall?
Christy
Thursday, October 24, 2013
.....BOO 2 U :) :) :)
Hello Hello :)
So aren't all of the teams Halloween and Fall creations so far just totally AWESOME?!!!!! Well I think so :)
Today I would like to share a layout I created using the fabulous Jenni Bowlin Studio October Kits.
Aren't the large gold sequins just fabulous?!!!!
One of my all time fave JBS embellishments is the buttons :)
aaaand what is not to love about the JBS bingo cards?!!! :) :) :)
I did have a lot of creative fun with the kits this month, here are some sneaks of some more layouts :)
So loved the fall colours of these kits :) :) :)
Cheers for now and Happy scrapping :)
Wednesday, October 23, 2013
Got Cardboard & Twigs? Make Halloween Owl Tags!
Need a sweet and easy way to dress up your Halloween treats this year? If you have cardboard boxes, twigs, and a die-cutting machine you can make these adorable tags up in a flash.
I made a bunch of these assembly-line style for my own neighborhood kiddos and made another bunch with my crafty group to sell for charity. They were such a hit, we needed to get back into production for a second run.
The supplies are easy to find and substitutions can be made:
cardboard boxes
twigs
black cardstock
yellow round bling
various scraps of fall patterned paper
brown ink
eyelets (optional)
twine
Jenni Bowlin Studio @ JessicaSprague.com Halloween Merry digital kit
Here's how they were made:
1. The cardboard boxes and twigs were gathered.
2. The boxes are ripped down to an irregular shape approximately 4-1/2 inches x 3 inches. This will form the "tree trunk". Expose the cardboard ribs by ripping and peeling the top layer of the cardboard. Imperfection is the key here! There is no need to be perfect, nor to have each piece look the same!
3. The ribs are inked with any brown ink.
4. The Halloween Merry digital kit contains two owl images as .svg and .dxf for cutting in most die-cutting machines. Load the one labelled "Halloween Owl" into your cutting canvas. This image will have both owl's eyes attached so the image can be removed from the mat with both eyes in place.
Digitally erase the branch on the owl image, so just the owl remains. I also erased his detail feathers for the cutting to go faster, but you can leave them if desired. Resize the image to about 3.25 inches and copy and paste as many as can fit onto your canvas. Cut the owls out onto black cardstock. Using a swiss dotted black cardstock looks so stinkin' cute, but any black cardstock will do.
5. After your owls are cut, you can give their eyes that spooky nighttime look with round yellow bling.
6. To create your banner, print Happy Halloween multiple times from your word processor program, cut them out, add quick notches to make a banner, and ink the edges. I used the font: Bleeding Cowboys.
7. Punch or cut leaves from scraps of autumn patterned paper.
8. Glue all your pieces together, using a pop-dot under the owl's body and fitting the twig and leaves underneath his "bum". Wrap the banner around the twig and glue in place. I used a hot glue gun to adhere everything.
9. Last, punch a hole in the top of the tag, add an eyelet if desired, and string with twine.
Even though these are so easy to make assembly-line style, each owl tag will be different! Tie these around goodie bags, candy bars, or display on tree branches. They are sure to be a hit at your house like they have been around here!
Monday, October 21, 2013
carve pumpkins
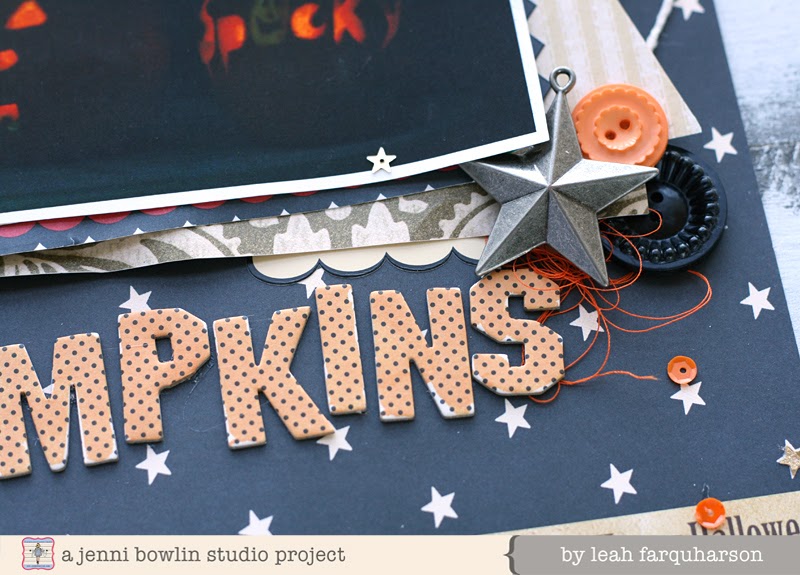
Pumpkin carving pretty much tops our list of favorite activities for autumn as a family - yes, we set aside a Saturday in October when we grab pumpkins (either from a local farm or grocer) and carve them together as a family. Time goes into choosing a personal design, and as the years pass, we have to help the boys less and less.
It's always fun to see their creativity shine through when we're finished!
I have loved this Halloween collection from Jenni for so long, it was amazing to have the opportunity to work with it this year! The navy blue is the perfect compliment to the bright orange, and by adding just a few neutral sheets from the Haven and Modern Mercantile collections, my page just pops with that dark photo... A few touches of orange ink to the alterable alphas and remember this sticker, and I just love how this came out.
Do you have any traditions surrounding autumn activities or pumpkin carving?
Thursday, October 17, 2013
Sweet Halloween Ornaments
I have a great stash of little tiny cute things. Things, that are so much fun to wire up and make ornaments from.
So. Much. Fun. The Bingo Card bases were made by punching out stars from the middle, placing vellum in between and sandwiching them together with another Bingo Card.
I wired the cards and added all the sweet tiny Halloween details.
I did the same with a butterfly cut from my cameo.
They were so much fun to make and to look at with the sun shining through the peek-a-boo vellum cut-outs.
Supplies:
Fiskars Star Punch
Ribbon by May Arts
Thursday, October 10, 2013
Ghosts, Goblins, and Fright Oh My!
Hi! Tina here today!
Halloween is my favorite holiday of the entire year. I'm not sure what draws me to the season - perhaps it's the fall time weather, or the gorgeous colors in nature, or the fun ghostly characters of the holiday. If I could decorate in Halloween decor the entire year, I surely would!
Today, I'd like to share a Halloween Home Decor project that was super fun to create, and will be cherished for years to come!
I filled each cubbie of my 7gypsies printer tray with all sorts of Jenni Bowlin goodies, vintage finds, and unique, one of a kind embellishments.
I aged Jenni Bowlin cards and stickers with alcohol ink and distressed the edges with Distress ink.
I created these little 'potion' vials with cork, embossing powder, and glossy accents. :)
So what is your favorite holiday? We'd love to know!
Thanks for stopping by today! Have a great week!
Halloween is my favorite holiday of the entire year. I'm not sure what draws me to the season - perhaps it's the fall time weather, or the gorgeous colors in nature, or the fun ghostly characters of the holiday. If I could decorate in Halloween decor the entire year, I surely would!
Today, I'd like to share a Halloween Home Decor project that was super fun to create, and will be cherished for years to come!
I filled each cubbie of my 7gypsies printer tray with all sorts of Jenni Bowlin goodies, vintage finds, and unique, one of a kind embellishments.
I aged Jenni Bowlin cards and stickers with alcohol ink and distressed the edges with Distress ink.
I even distressed several vintage die and metal clock hands.
I created these little 'potion' vials with cork, embossing powder, and glossy accents. :)
So what is your favorite holiday? We'd love to know!
Thanks for stopping by today! Have a great week!
Wednesday, September 25, 2013
Prepare Yourself for a Treat
Have we got a treat for you today! We have two digital kits on sale which are not only great for digital scrapbooking, but can be used for your pocket pages and hybrid pages too.
And now for the real treat! Take a look at the incredible inspiration from our design team!
Van Nguyen created this digital layout. The patterned paper Van used for a background is one of my favorites and I just love the addition of blue Jenni designed into the collection. Van also used our Halloween Merry kit to create the pretty subtle vine pattern in the middle. Such a clean, fun layout!
Audrey Tan created this striking Halloween layout. I love the use of the stars background. It makes the photo and embellishments pop, doesn't it?! Doilies on a Halloween layout?! I never would have thought to do that, but it looks perfect!
These kits are only on sale through midnight tonight PT, so hop right on over and grab yours!
You can find our entire Digital Shoppe right here!
Our Halloween Bingo Card Kit is only $1! Yep, that's right! Only $1 through midnight PT!
Our ever popular Vintage Halloween kit is 50% off. There is so much in this kit and you will LOVE it for those fun Halloween layouts and projects!
And now for the real treat! Take a look at the incredible inspiration from our design team!
Nirupama Kumar created a great hybrid Halloween invitation! So adorable! I just love Jenni's owl!
Supplies:
Jenni Bowlin Studio: Halloween Bingo Card, Vintage Halloween Kit, Block Alpha Red On Black
Anna Aspnes: ArtPlay Palette Wicked, Curled Edge Frames No1
Julianna Kniepp: Be You
Font: Clipper Script Fat
Audrey Tan created this striking Halloween layout. I love the use of the stars background. It makes the photo and embellishments pop, doesn't it?! Doilies on a Halloween layout?! I never would have thought to do that, but it looks perfect!
These kits are only on sale through midnight tonight PT, so hop right on over and grab yours!
You can find our entire Digital Shoppe right here!
Monday, September 24, 2012
Digi Monday: Apothecary Labels and Halloween Bingo!
It's another edition of Digi Monday on the JBS Inspiration Blog! We're featuring two new kits today:
These labels are great as a basic addition to your digital stash and to keep handy for hybrid projects. See how Amy Kingsford used the labels in this layout "So Lovely". Yes it is Amy!
Supplies: JBS Apothecary Labels and Borders and the Front Porch Collection.
Additional supplies include: Manic Monday by Kristin Cronin-Barrow, Fresh by Sahlin Studio and One Little Bird and Stitched by Anna White Borders by Anna Aspnes.
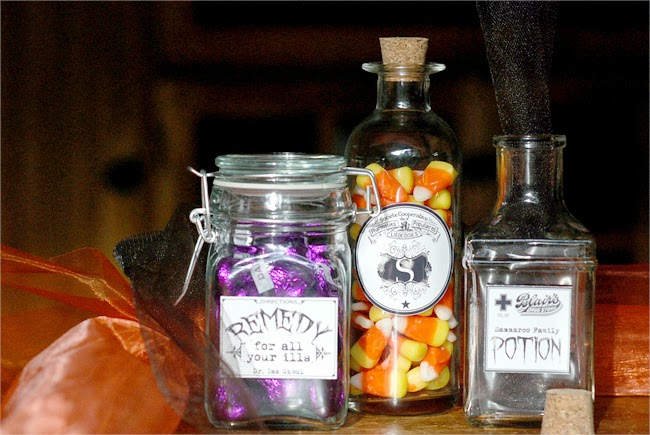
Wouldn't these labels be awesome for Halloween? I added my own text to three of the labels in the kit to make some haunted labels for my Halloween goodie display:
I found the bottles for only $1 each and the labels look incredibly real and professional printed on glossy photo paper! In the "potion" bottle to the right I stuff a bit of black tulle and pulled some out of the top - it's hard to see in the photo, but it looks so cool - a bit like magical smoke!
Also released today is our Halloween Bingo Card Kit. Oh the possibilities! Sure, they can be used on layouts, but how about using them as treat tags, banners, and divided page protector pages? The printable pages in ALL our Bingo Card Kits are sized to approximately 3x4 inches. Perfect for those divided pages!
As always, the kits are 25% off on release day!
These labels are great as a basic addition to your digital stash and to keep handy for hybrid projects. See how Amy Kingsford used the labels in this layout "So Lovely". Yes it is Amy!
Supplies: JBS Apothecary Labels and Borders and the Front Porch Collection.
Additional supplies include: Manic Monday by Kristin Cronin-Barrow, Fresh by Sahlin Studio and One Little Bird and Stitched by Anna White Borders by Anna Aspnes.
Wouldn't these labels be awesome for Halloween? I added my own text to three of the labels in the kit to make some haunted labels for my Halloween goodie display:
![]() |
| fonts used: October Crow, Mom's Typewriter, Kerawang, Soft Ornaments Five |
Also released today is our Halloween Bingo Card Kit. Oh the possibilities! Sure, they can be used on layouts, but how about using them as treat tags, banners, and divided page protector pages? The printable pages in ALL our Bingo Card Kits are sized to approximately 3x4 inches. Perfect for those divided pages!
As always, the kits are 25% off on release day!
Subscribe to:
Posts (Atom)