

Thanks for the inspiration Ranjini!


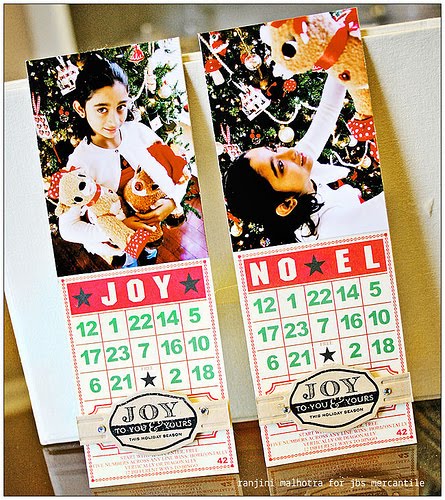 Now that we're getting down to the wire and Christmas is approaching quickly - I thought I'd share an idea for a card that is easy and quick to do! Photo cards are all the rage nowadays and here's a fun way to incorporate the concept of a photo card with the vintage JBS look that we all love! To keep it super simple, I used the JBS Christmas Bingo Placecards. All I had to do was cut my photos down to size and adhere them to the top half, and then I added a diecut and stamp at the bottom (from Papertrey Ink). Then back the whole card with cardstock cut to size to prevent the recipient from folding it down the middle. You could even punch a hole at the top and hang it as a tree ornament. Super simple and quick! Happy Holidays!
 When Doris came up with the idea of the entire design team creating individual pieces to be contributed to our Christmas garland, I thought it was a fabulous idea. I've loved seeing all of the girls' gorgeous pieces and it's been a reminder of how versatile and lovely Jenni Bowlin products are!
 I wanted to use Jenni's tart tins and a Christmas themed bingo place card and concocted this piece. I chose the "Give" Bingo Card and added the Santa image and bell because it called to mind the Salvation Army Santas with their bells that collect for the needy during the holiday season and I love the giving aspect of the holidays.
 I love Jenni's new halloween collection and wanted to make something quick and simple for halloween using the new paper collection. I especially love that the journaling cards are so versatile and can be used on a layout, as a gift tag, or a stand alone card. I chose to make a card and a mini treat bag. I used my diecutting machine to cut the little paperbag and assembled it (die from Papertrey Ink). Then I turned to some of my longstanding favorites - Jenni's rubons, vintage style buttons, label stickers and chipboard stars to mix in a bit of older product with the new. I applied the rubon to the oval shaped label sticker, then placed it on the bag with a pop dot. I then tied the button to the handle after threading it with baker's twine and whipped up the card quickly by adding a chipboard star, inked, embossed and glittered. I added the stamped sentiment with a Papertrey Ink stamp and die, using Jenni Bowlin for Ranger ink in Fountain Pen. Super simple and easy to do, and it's ready to fill with tiny treats and gift to your favorite little spook! These would also make cute favors for the class halloween party or for a coworker.

 Jill Sprott totally worked the October Antiquarian kit . . .
 Megan Klauer mixed in lots of fun bits from the Artisan Add-on . . .
 And here is a beach classic from Ranjini Malhotra where the postcard stamp from the main kit was once again used along with some bits from the Artisan Add-on and a must have button from the project kit. See why we're so inspired? It's going to be another lovely month in the gallery!
 Today we have a simply delightful teacher gift and accompanying card from Ranjini Malhotra.
 When I first thought about doing a teacher gift, I decided that I wanted to do something pretty and elegant that Alekha's teacher could hang in her classroom. I bought this hanging file holder from Target and altered it very simply using JBS patterned paper (Red/Black Line Extension III) on the front face. Because the file holder is made of metal, you could also add coordinating magnets on the front. I added chartreuse trim, and a gold ribbon with red seam binding for accent. I created the vintage label with the teacher's name and the school's name in Photoshop. I love the finished look.
 Once I used the vintage kids patterned paper for the metal file folder, I decided to do a coordinating card and used the photo card from the Haven Accessory Paper. I trimmed it down and added the humorous text "The teaching staff could barely contain their excitement at the thought of another school year," for some lighthearted humor for Alekha's very hard working teacher! I accented it with JBS tickets, JBS star chipboard, the JBS red bow and stamp.

 Today we're "Heating Up May" with a very bright and festive card, complete with instructions, from Ranjini Malhotra:
 Continuing with our Ranger theme this month, we have a charming Easter card from Ranjini with a great stamped background. Ranjini says, "I used Jenni Bowlin for Ranger Ink Pad in Seed Packet with a clear polka dot background stamp from Papertrey Ink to create the dotted background. Then I added goodies from the February Kits mostly to create this little easter greeting. I did stamp the background twice for a darker color green."
 I have been wanting to use my Jenni Bowlin for Ranger Acrylic Paint Dabbers on fabric for some time and I recently found a stash of needlework fabric I had from my cross-stitching days. You can purchase this type of fabric in most craft stores. I simply cut the heart shape using pinking shears and then covered the fabric hearts with the dabber paints in Cough Syrup and Chewing Gum. Allow the paint to dry completely. If you're impatient like me, you can use your heat gun to speed drying. If the heart curls up or warps, you can iron it flat (on the side without the paint, on a low setting very quickly - don't apply too much heat and don't iron for too long. Then attach the heart to your card base. If you like, you can stamp a sentiment on the heart. I stamped the Be Mine sentiment (Northwoods Rubber Stamp) using Papertrey Perfect Match Hybrid Ink in Fresh Snow. I I added embossing powder in white and embossed the sentiments on to the fabric. Add a few stick pins, JBS labels, seam binding and vintage buttons and you're done - simple and lovely valentines.
 What a sweet technique! Thanks for the inspiration Ranjini!
 Isn't this just the most adorable little photo display? Ranjini is so clever and talented! I hope you didn't think all the excitement was over now that we've shared all of our CHA Winter 2011 release . . . we've got lots more fun and inspiration planned for you! Along with our regularly scheduled posts this week we'll also be sharing more projects created with the new stuff PLUS Jenni has the most amazing new show booth . . . we hope to show it to you this weekend.
 Bittersweet. Our last day of peeks (till next time). It's been an exciting week, hasn't it? Here's a gorgeous set of home decor pieces from Ranjini Malhotra. Do you know what's coming next? I like to call them the basics. Be back at 9 am cst with our final CHA Winter 2011 shares . . .
 The idea for this card came from the Feb 2010 copy of Victoria Magazine. They featured cameo cards created by their artist in residence Olivia Kanaley. They provided the silhouette images from the artist in a download, which is available at www.victoriamag.com/article.aspx?id=6796
 Lovely! Thanks for the inspiration Ranjini!
 Apply the dabber to the rubber stamp and stamp the background. Use a heat gun to speed drying time. Cut a page from a vintage children's book and apply it to cover an index tag. I loved this one because the design mimics the graphics on Jenni's banner stickers. Embellish the tag with the fabric yoyo and button. Add banner stickers to the chipboard elements and adhere to top of card. Add alphas to spell out a sentiment if desired. Add a piece of trimmed scallop edged cardstock along the length of the card.
 Supply List:
 One thing I love about Jenni's rubons is how easy they are to use - they go on like butter. I used the silver damask background rub-on single to make this card. This is how I created the white space that forms the heart in the center of the card:
 I love Halloween decor and I try to create something for Halloween every year; I knew the bottlecaps would be perfect for my halloween project this year. I used the bottle caps from the August Project kit and mounted them on a box lid that I decoupaged. Actually, it is the bottom of the box - and held Christmas Cards last December. I decoupaged the box with vintage text and then glued the larger JBS Halloween bingo cards on the inside. Then I adhered the three bottle caps inside on top of the bingo cards.
 I added some JBS Vintage Style Sew-On buttons in perfect pumpkin orange. The tiny bingo cards were cut from the bingo card backing sheet.
 I covered the chipboard number stickers that were in the August Add-on kit with vintage silver german glass glitter.
 Frightfully delightful! Thanks for the inspiration Ranjini!
 What a darling little dress! and Ranjini was so clever in its construction! It's made with a sheet of paper from the JBS Memo Note Books! Here's how . . .
 I love to keep all the unused extras from JBS Monthly kits so I can create a random layout when the inspiration strikes. On this one, I simple added the Baby Girl diecut label paper on the edge as a border and then used the large monogram letter B from a past JBS kit to start off my title. I staggered a few photos underneath and finished it off with a butterfly, a few buttons and an old mini tag from my stash. When creating a layout like this, arrange your text and font work on a document and print it out on copy paper before you print on cardstock; that way you can line everything up and make sure it's all aligned where you want it.
 I loved the Kaiser frames so much I decided to split them into two different frames to use for two separate projects. On the first frame, I used the patterned dot paper around the edge of the frame. I then added some Basic Grey paper for the focal point of the frame.
 I punched birds from the pink crepe paper and placed them on the birdcage paper. I then placed the vintage millinery as shown. I added a ruffled ribbon, a rosette flower at the top and a diecut at the bottom.
 I wanted to use the frame horizontally this time, and decided to create a scene of Paris' famed Bois de Boulogne in the spring. I used the patterned paper to cut a house shape, the roof, as well as bushes. I also used the packaging of the American crafts rubons to cut the tree top.

I used the strip at the bottom of the My Mind's Eye patterned cardstock as a tree trunk. I used the vintage text from the project kits as my background. I added some other diecut embellishments (mostly from K&Company's new Madeline Collection) as well as a vintage button to embellish the roof of the house.
 The bird at the top of the house was cut with a Quickutz die. I added a little ribbon and flower to her neck. I really loved how this turned out!

