Showing posts with label stencil. Show all posts

Wednesday, October 30, 2013

leafy layout..

Hi, Gina here sharing a Fall layout with you today..I love to get outdoors here in Australia and photograph the gorgeous Autumn leaves..so I've used them as my inspiration for this layout..

autumn colour

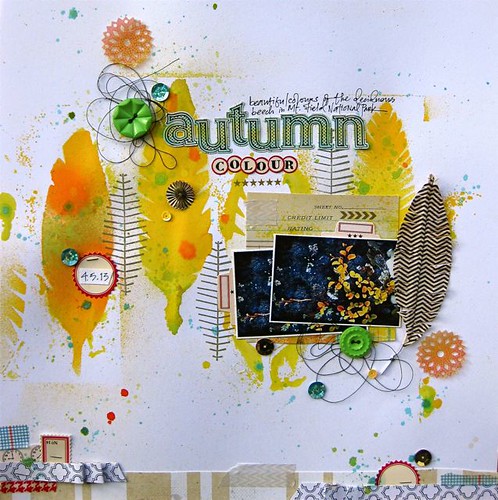
I've used the graphic leaf stencil and lots of bright mists to replicate the leaves in the photo..then stamped in between each leaf with the exclusive graphic feather..

the classic tiny dot alphabet stickers used in the title ink can be coloured easily with ink, and I've used a blue-green combination here..

IMG_0250

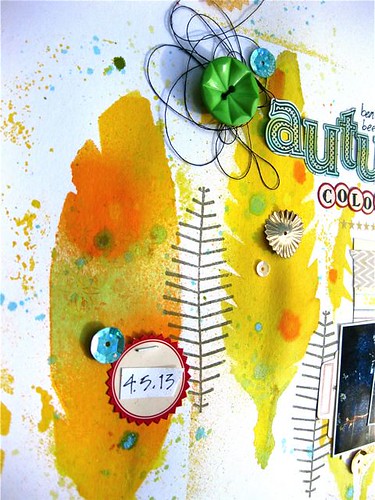
adding also a scattering of bright green vintage buttons and sequins including the pot of gold and doily assortment..  Once again I've used a feather as a substitute for a leaf with a cardstock feather 

The border at the bottom of the page is made with layers of paper off-cuts, some stickers and paper tapes

IMG_0230

Thanks for stopping by and don't forget to share your Autumn/Fall layouts in the JBS gallery! xx


Pin It!

Thursday, August 29, 2013

NEW Cards and Stencil


Hi everyone! Harumi here.Today I am sharing with you a layout I made using the new JBS products.


Gold doily rub-ons is shining. I cut out the Feathers with the Stencil.

I love the Vintage Flashcards.These words make me really happy.


Happy creating!


Pin It!

Wednesday, August 28, 2013

Sequin ♥

Hi, Gina here today to share a couple of layouts using some brand new JBS goodness!

I've gone for a soft look on this layout and misted the background using the exclusive trellis stencil and spray inks. Another great way to add detail on the background is with the exclusive ink spots stamp and inks to match your chosen spray inks..


I've added in the chipboard clock, vellum butterfly, perforated labels and sage skinny alpha from previous releases..


I think my absolute fave new release product would have to be these pretty doily sequins with such lovely colour variations and texture! I wanted to feature them here so have stitched a few in place across the page...


For this layout, I've used a few of the gorgeous and exclusive papers designed by Lisa Dickinson including this background paper which was perfect for the theatre theme of my page...


Other new products include the "pot of gold" and "classic" sequins, tiny trims gold rub-ons and mini-deck cards. I've also incorporated some vintage dress pattern from my stash 


it's hard not to include a few all time fave items from previous JBS lines too..such as stickers, digi-cut file stars, and a few paper scraps


thanks for stopping by and happy scrapping! x

         
Pin It!

Thursday, August 15, 2013

art journal layers


In the midst of juggling the hustle and bustle of life, it was good to take a few moments this morning to just breathe. I've been learning more about mixed media and art journaling techniques, and Jenni's new products are the perfect fit for exploration. They are amazing for creating layers on your pages! From the stencils for backgrounds, to the rubons, washi and sequins -they work so well to build texture and depth into your projects.


One quick tip to create this watercolor style background. The chicken feed reinker creates a beautiful shade of gold when you drip several drops into a cup or on a tray, then add just a few drops of water on a wet broad, flat brush. Using broad strokes, gently brush over the graphic feather stencil. Remove the stencil, and either allow to dry a bit, or hit it with a heat gun. After I had finished places my feathers on the background, I added a few drops of cough syrup reinker to the leftover ink to create a blend. Using a slightly wet brush, I gently went over my entire background. The bleed from the feathers turned out beautifully.


After my background dried, I was free to start layering.


And finish with a bit of doodling.

As I have embraced allowing imperfections in my life {yes, I'm a perfectionist - especially in all things business related}, I've found that I have embraced the freedom of art journaling more and more. Hope you're inspired to try some of it, too!

~ Leah
Pin It!

Tuesday, July 30, 2013

JBS Mercantile Inspiration from Gina Rodgers

Hi, it's Gina and I'm very excited to share some creations with you as Guest Designer, using a multitude of gorgeous supplies from the June Papercrafting, Artisan and Historian add-on kits

First up, behind the photo I've layered some 2013 exclusive JBS patterned paper with a section of vintage perforated address labels which have been machine stitched for texture. I've also added some messy thread and a section of ribbon, which has been pleated and secured with mini fasteners


I've gone for a more subtle colour scheme on this next layout and fell in love with the exclusive Mercantile Ink Spots stamp. I've used a combination of chalk inks on the stamp for a few touches of colour


In this last layout, I've created a background with a few scrapes and smears of white gesso. Once dry, I traced inside some stars from the exclusive JBS scattered stars stencil with a black fine liner. With a little water on a small paintbrush I dabbed the outlines in a few spots to smudge the lines and create a bit of a 'grunge' effect


Happy Scrapping!


xox


Pin It!

Life's a Beach..

Hi, it's Gina here sharing a layout of a one of our many holiday snaps from last summer. I've used items found in three June JBS kits; the Papercrafting, Artisan and Historian Add-ons. As you can see I've had a lot of fun creating the background on this one. I've used the left over sticker sheet from the Papercrafting kit as a frame work for some misted paper scraps. The stars were created using the Mercantile exclusive scattered stars stencil also from the Papercrafting kit.


I've stencilled both positive and negative star images by spraying through the stencil and also printing with the excess ink left of the surface.


and to highlight the colours I've mounted the sticker sheet with some bright aqua cardstock.


Thanks for stopping by and I hope your week has been a creative one so far!


xox

Pin It!

Thursday, July 4, 2013

JBS Mercantile Kits for July | Lisa Dickinson

Hi JBS fans!  Today I wanted to share one of my layouts from the July Mercantile Papercrafting kit. It's filled with lots of Basic Grey's new line, Carte Postale which is perfect for documenting summer travel and outings. There's also lovely papers from Crate and My Mind's Eye, as well as two exclusive papers that I designed especially for the kits:


I adored the bold chevron kraft pattern from Crate Paper and knew it would be perfect for an outdoorsy layout about my son and his grandpa's fishing trip:


I used snippets of the Basic Grey ticket paper and some of their perforated stamps, as well as a tag and mini envelope to matte my photos.  I also tucked in some seal stamps (from the kit exclusive stamp set) that I imprinted on transparencies and punched out with a circle cutter.

The chevron stencil in the kit was perfect to add a tiny bit of detail on my background. I just traced the stencil using a fine tip Sharpie, adding a row of chevrons to each side of my photo.

My title is a combo of a die cut word (using the teal cardstock in the kit) and the Basic Grey Micro Mini Alpha stickers. I added a tiny bit of baker's twine and a little hand-cut fish to finish it off.

If you haven't grabbed a Papercrafting Kit yet, be sure to hop over to Mercantile and get yours.  The Artisan Add-On, Historian Add-On and Mini Album Kit (designed buy Jenni herself!) are still available and we'd love to see what you create with them!


Pin It!

Tuesday, May 14, 2013

The cutest stencil...

The cutest stencil ever is in this month's paper crafting kit.  Oh my goodness it is awesome.  Have you seen it?  Here is the stencil cut file image to give you an idea of how cool it is.


I really enjoy using stencils.  There are so many ways to use them too.  You can use a stencil with mist or paints or gesso or even a pencil.  I also like to use them with some modeling paste to create a dimensional image from the stencil.  They really are a lot of fun to play with.

I used this month's stencil with some modeling paste and then painted right over it.  It is awesome for a customized look on your pages and projects.


I just love the texture.

Here is another detail of my page.


And all together!


These kits are FABULOUS!  Definitely snag one before they are all gone!

~Corrie
Pin It!

Saturday, April 13, 2013

JBS & PDCC..'look down'

Hello, did you join in with the Play Date challenge? What a lovely lot of inspiration from the JBS DT and Ambassadors during the week...I'd like to also share my take on the challenge today..

for the background of this page I firstly added some gesso with a palette knife and once dry placed the exclusive stencil over it and created the pattern using a weather vane paint dabber


I've also used a couple of new stamps on this page including the one below which came in the exclusive 'canning jar' stamp set. I've stamped it out several times onto white paper and then cut it out and added a bit of journaling in one..the white paper makes the journaling stand out and also allowed me to move them around until I was happy with the placement before sticking them down..


How cool are the new flatbacks range? I've used one from the 'icons' set along with a piece of the packaging behind the photo for contrast.. 


the other new release stamp is from the 'dictionary' set and I've just inked up a small amount of the text stamp and pushed it down with my finger rather than using a stamp block..


thanks for stopping by and happy creating!


xox
Pin It!

Monday, March 18, 2013

Playing with Gesso, stencils, alpha stickers and spray mist.

Hello and Happy Monday!

Tina here today with a layout I created using bits & pieces of the March Papercrafting kit, the March Artisan Add On kit, and the March Mini Album kit. I added some gesso, stencils, alpha stickers and spray mist to create a fun and unique background.

To create my 'one of a kind' squares for my background, I started by randomly placing stickers on a piece of scrap chipboard.


Then, using one of Dina Wakley's FABBO stencils, I applied clear gesso to the letters and chipboard.


After this was dry, I sprayed several shades of yellow spray mist on the letters and chipboard and randomly cut into squares.  I lightly patted (removed) some of the spray mist to reveal the chipboard underneath.


Before I stitched the squares to the base layer, I used the exclusive stencil from the Papercrafting kit to add more texture and depth to the background.


And here is the finished layout and several more close-ups.


Next time you want to create an interesting background for your project, or create a 'one of a kind' look, try using some gesso, a stencil (or two), some alpha stickers, and spray mist.

Don't forget to check out our latest challenge - CALVINBALL 2013!   There is still plenty of time to play along!

Thank you for stopping by!  I hope you have a great week!


Pin It!