Showing posts with label washi tape. Show all posts

Tuesday, December 17, 2013

a holiday hotel key holder


I finally had a moment to update my hotel key holder this morning for the holidays! Yay! If you've been following along on my personal blog, I posted a mood board for my holiday projects this year, and I'm really happy with how everything has come together.


I love this hotel key holder - it hangs in our dining room and is easy to update for the seasons  with little bits and projects...


I loved the German foil pieces in the December mini album kit - they were such a great touch for the board!

Happy Holidays! 

~ Leah

Pin It!

Thursday, September 5, 2013

A junker. post and a pop-up card~

Hi everyone~
I have a stack of vintage photo album pages, ephemera, labels, old canceled checks, ledger sheets, blank receipts and more!!  It looks like this~

I wanted to put it all together in a book. A book that I could keep adding to.  A book that I could take things out and use if need be.  So I did~

 Look real close and you will see all kinds of goodies (that are in the Mercantile/ flea market section).  I named it  "junker. @ heart"~  It's true!!!!
Here are the inside pages~

I used the JBS stickers and washi tape.  Used my Bind-It- All to put it together!
I was recently introduced to pop-up cards.  I love making them.  So I thought what about a Jenni style pop-up card. So I did~

Remember with a pop-up card,  it's not what is on the front that counts, It's what is on the inside that counts:):)
This is the front~

Jenni makes an awesome pop-card:):)
The pop-up dies are by Sizzix and the brain child of Karen Burniston.  They are very addicting.
 
Thanks for stopping by~
Connie M
Pin It!

Thursday, August 15, 2013

art journal layers


In the midst of juggling the hustle and bustle of life, it was good to take a few moments this morning to just breathe. I've been learning more about mixed media and art journaling techniques, and Jenni's new products are the perfect fit for exploration. They are amazing for creating layers on your pages! From the stencils for backgrounds, to the rubons, washi and sequins -they work so well to build texture and depth into your projects.


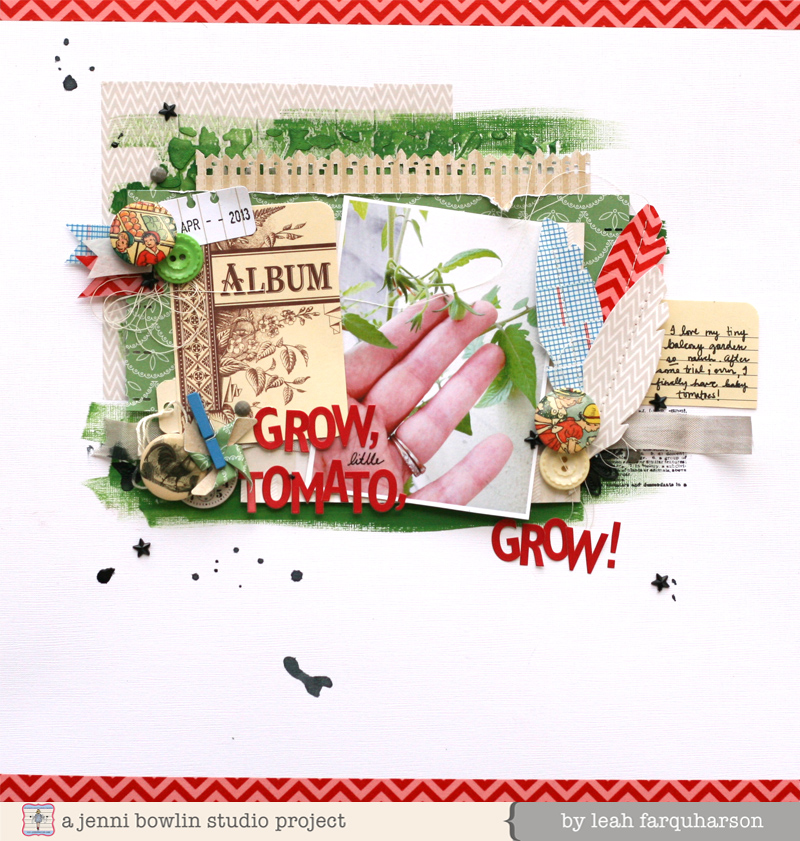
One quick tip to create this watercolor style background. The chicken feed reinker creates a beautiful shade of gold when you drip several drops into a cup or on a tray, then add just a few drops of water on a wet broad, flat brush. Using broad strokes, gently brush over the graphic feather stencil. Remove the stencil, and either allow to dry a bit, or hit it with a heat gun. After I had finished places my feathers on the background, I added a few drops of cough syrup reinker to the leftover ink to create a blend. Using a slightly wet brush, I gently went over my entire background. The bleed from the feathers turned out beautifully.


After my background dried, I was free to start layering.


And finish with a bit of doodling.

As I have embraced allowing imperfections in my life {yes, I'm a perfectionist - especially in all things business related}, I've found that I have embraced the freedom of art journaling more and more. Hope you're inspired to try some of it, too!

~ Leah
Pin It!

Thursday, August 8, 2013

New Releases

I am totally in love with the new Jenni Bowlin sequins.


They are simple and awesome.  And I love how they add a big of fun and sparkle to my pages.


I added the sequins to this page I created after finding all these crazy selfies of my daughter on my iPhone.  How hilarious to me that she made faces and took pictures for me to find.  And that she was not embarrassed enough to erase them.


I am loving the gold rub ons and large sequins as well.  Such fun embellishments to play with!


These sequins are already hitting stores!!  YAY!  I hope you check them out and have a bit of fun.

~Corrie
Pin It!

Wednesday, June 26, 2013

Another Elle's Studio and JBS project..

Hi everyone, it's Gina here sharing another Elle's Studio and Jenni Bowlin collaboration layout today. I really enjoyed using the Elle's Studio 'Cameron' line, and found that the fun, bright colors are suited to girls layouts too! And after seeing all the DT/Ambassador creations this week I'm sure you would agree that this line also combines beautifully with a range of JBS products.


I've used Modern Mercantile 'Novelties' paper for the background and added some gesso then spray inks to stencil through a section of stars from the Digital Backdrops 1 file. I've cut some of the left-over  misted stars out placed them around the page. These stars compliment the cute Elle's Studio star stamps too! A new JBS fave for me is this gorgeous delicate decorative brad


I've cut a 12" strip from the kraft die cut paper and added a few different Elle's Studio papers behind. I've also used some cute Tidbits and a Tiny Tag..


Further layers have been added using JBS paper tape, stickers and a green vintage button


Thanks for stopping by!

xox
Pin It!

Wednesday, May 29, 2013

Layout with Washi Tapes

Hi everyone! Harumi here!
I want to share with you a layout I did using Jenni's new tapes.


I put two kinds of tape(this and this) and punched it, put rub-ons of star in center.


I love the Magpie Paper Collection! I chose Nest and Compile.


Let's enjoy using Washi Tapes!
Happy creating!


Pin It!

Wednesday, May 1, 2013

birthday wishes!


Sending lots of birthday wishes out to the fabulous and talented Ms. Jenni Bowlin. She's an inspiration for any woman in the industry...

I wanted to offer up a little bit of inspiration in this post and mention that I actually lifted a few of the ideas from my last layout to create this card - because if you love something, it's worth repeating! To speed up the process, when I cut my feathers last time, I cut a whole page. It's an element that I love using in projects right now, and they'll never go to waste! :)

Here's a closer photo of the modeling paste detail...


Pin It!

Monday, April 29, 2013

Using JBS for Project Life


Here's the page I made using JBS for my Project Life album documenting my son's birthday back in November. I used a combination of JBS digital and traditional supplies. 

I used Jenni's little red circle alpha/number stickers to mark each photo so I could reference the journaling on the cards. Instead of each photo having a corresponding card, the journaling flows from card to card so that I was able to get more journaling on the page.

The first card is simply bordered with JBS washi tape. The second and fourth cards are JBS digital and I printed them on brochure paper. The third card is simply a border line of Jenni's washi again. 


I used the 7 hexagon sticker because it was his 7th birthday. I thought the little stamp sticker was a cute, subtle touch. I used a combination of typewritten and handwritten journaling. 


I love the first small pocket! I kept it simple and the clock was the perfect finishing touch on the tag. The "journal" card is another JBS digital card. Finally, I made another washi bordered card to balance across from the other washi card. 


Thanks for stopping in today!

Briana

Supplies used:


Pin It!

Tuesday, April 23, 2013

Washi Tape as Patterned Paper

Welcome back to another post featuring the fabulous new JBS paper tapes! This week, we'll be showing you all kinds of inspiring and fun ideas for this versatile supply.

While I am often reaching for these tapes to add that "little something extra" to a page, I challenged myself to use them as the main supply on a layout. After cutting two of the JBS Kit Cuts (from the Heart Cards set) from white cardstock, I filled the negative space with strips of paper tape:


The red Double Chevron, blue Notebook Grid, green Sage Lace and gray Sideways Chevron (combined with another yellow tape!) were the perfect touch of color and pattern for my page.


The paper tape was quick and easy  - much faster than cutting strips of patterned paper. I know I'll be using the tapes more often this way on future projects!


Pin It!

Sunday, April 21, 2013

washi layers, banners, and feathers

Happy Sunday all! checking in with some more ideas for using the brand new washi tapes that Jenni recently released! I decided that when I started this project I wanted to focus on how versatile washi is - and I think I accomplished my goal.

I started by layering this tape as an anchor or base for my design. And this one along the edges to give it a pop of color. I combined one more into the mix to create the washi banner pieces.


I used a number of the lovely Jenni Bowlin fiskars punches in different places throughout this layout, too.

My last use of the washi tape comes in the form of these feathers - I laid a bunch of the tapes down on a piece of cardstock and cut feathers using one of the exclusive silhouette cuts from a JBS Mercantile kit.

I hope I've given you a few ideas to spark your creativity this weekend!

~ Leah

Pin It!

Tuesday, April 16, 2013

Scrapbooking with Washi Tape- The Golidlocks Technique


I am delighted that Jenni has added washi tape to her line of scrapbooking products, and of course her tapes are patterned with classic designs that will mix and match with ease.  I wouldn't expect anything less!  But this is extra brilliant considering a roll of washi tape - even used frequently - can last a long while.  All of the JBS tapes are great designs for that long-term use, and you'll never have to worry that they will go out of style.


If you're starting to collect washi more than you use it, try a trick for letting it help you embellish a page design.  Pick two tapes that work together for your page, and use three strips of each: one long, one short, and one in between.  Perhaps we should call this the Goldilocks Washi Technique!


Placing these three pairs of tapes on your layout then makes it easy to embellish things for a design that will always work.  I used the blue grid and whitewashed woodgrain tapes, and my smallest set is up at the top right corner, the longest across the middle of the page, and the middle set at the bottom.  Then it's just a case of choosing some embellishments you can repeat in those three locations, so I used a heart punch with the lovely blueprint paper from the Wren collection and a red doily.  Placing those three groups of embellishments and my photo first made it easy to finish the rest of the page because the placement was obvious: all that space to the left of the photo!  So that became a great place for journaling and some tags.  Of course, for a multi-photo page, you could easily replace some of the tags with additional pictures.  By keeping the three sets of tapes all on the horizontal and using them to anchor those repeated embellishments, the rest of the page comes together without worry.  Give it a try!


If you fancy more inspiration for your JBS washi tapes (and more red, white, and blue JBS goodness!), I have another project to share with you on my blog.  You can find this project here, designed as the facing page in my album.  These two pages aren't a double page spread in the strictest sense, but they have enough in common to certainly coordinate side by side.  


Pin It!