Showing posts with label wren. Show all posts

Wednesday, August 7, 2013

Unspoken....

Hi!  Tina here today!

Grids are seriously one of my favorite design styles.  They can be used in so many ways and they always look fresh and fun!

To create the grid on my layout today, I used the 'Perf Mark' stamp. I stamped it 4 times in the center of my page, then began 'filling' each square with JBS goodness.  :)


I used 'Notebook Grid' (which is one of my FAVE paper tapes EVER) and 'Bleached Woodgrain' Paper tape for several of my grid squares and paper from 'Wren - Blueprint' for the other grid squares.


I wanted to add some dimension to my layout, so I punched several Quilt Stars and added them to my page with foam tape.  For more interest, I added Blue Pearl buttons and several of the new JBS sequins to each star.

My layout needed some 'flash', so I added several of the new JBS Gold rub-ons.  I {heart} the Gold Bubbles and Tiny Trims rub-on's.  They are divine!

I finished my layout with a pop of RED and viola!


Thanks for stopping by today!  Have a wonderful and crafty Wednesday!


Pin It!

Thursday, July 25, 2013

Summer Weather

 Summer just isn't summer without a little sunshine, and perhaps, an afternoon shower here or there. Whatever the season, I think it's fun to document the weather and the activities it inspires us to do.


Most summers, we beat the heat by hanging out in the pool. I used a disposable underwater camera to capture this shot of my son. The seals on the seal grid stencil remind me of little suns. I pulled out my gelli plate and paints to create this fun print. The colors were very intense ( just like sunshine) so I kept the rest of the layout simple with a few Vintage Sew-on buttons,chevron paper tape and the star flatback.


We do get a lot of afternoon rainstorms. I love walking in the rain with my son. I used to walk with my grandparents in the rain. Sometimes, the rain would be pouring down while the sun was shining through the grey clouds. They called it liquid sunshine. The grey doilies in the Wren collection reminded me of clouds. I added some scraps from the Modern Mercantile line to represent the sunshine and blue skies peaking through the storm. I found the doily in a thrift shop. I love mixing in thrift store finds with my JBS Mercantile supplies.


For whatever reason, I never seem to find any good bits or baubles at the thrift shop. I usually end up buying one of Jenni's Embellishment tins. Every tin is a surprise. In my last tin, I got some little gold birds and awesome rhinestone bits. The little bits are just perfect for adding a little bit of sparkle to my layouts.

Weather is definitely a big part of my family's summer stories? It guides our daily activities and sometimes, leads us to special moments of quiet. How does the weather guide what you do? Have you documented it? I'd love for you to share some of your summer weather stories over in the JBS Mercantile community.
Pin It!

Tuesday, June 25, 2013

Plenty more JBS and Elle's Studio to come...

It's Natalie here with you today. We've had so much fun over the last week of our partnership with JBS and Elle's Studio that we've decided to extend the celebrations a bit longer. Hurrah! I know I personally couldn't get enough of working with all these fabulous products - as this barrage of projects will attest to!!


It was really easy to combine these two lines. Both the Cameron collection from Elle's Studio and our own Modern Mercantile collection have a lot of similar colours in them, whilst being quite different in theme. Cameron is a great line for scrapping boy photos so I couldn't get by without using this cute picture of my nephew.


I love the mix of bright fresh colours with a hint of vintage! On this first layout I introduced even more boy elements by including a JBS Silhouette card and one of the Reader Flatbacks.


My second layout is about the time my husband, my brother and his girlfriend went to a Home Innovation show and met Kevin McCloud (author and the host of Grand Designs) because they're all big fans. Given the theme of the layout I just knew the Blueprint paper from the JBS Wren collection would be a perfect background which gave me a lovely bright base for my layout. So as not to overwhelm the page with lots of other colours I focused on the blue and kraft tags from Elle's Studio.


One of the best things about these Alterable Alphas from JBS is that they take colour so well. I painted a few brushstrokes of red ink onto them to match the red highlights on my layout.


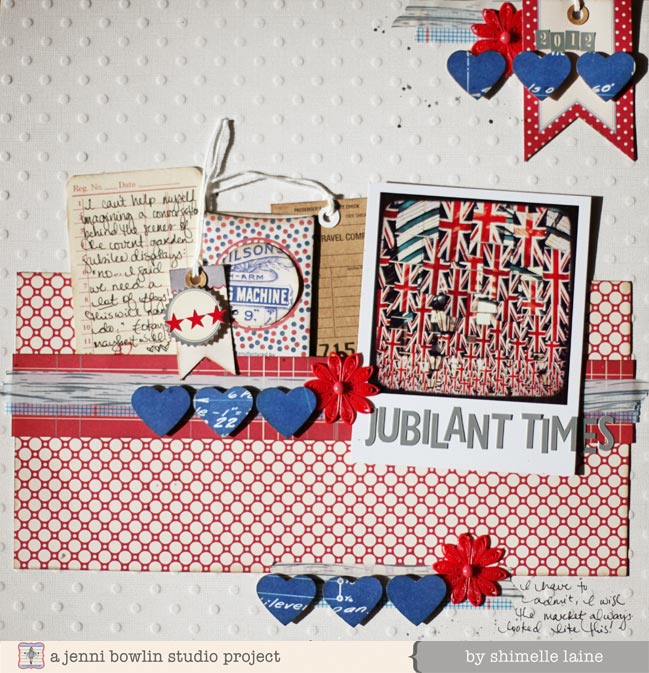
For my third layout I couldn't resist starting with the yellow Elle's Studio paper and then building up lots of the JBS Red Label Strip Stickers under my photo. It gives such a great contrast of colours! I also used the negatives from the sticker-sheet to give the impression of even more layers.


This is another photo of my nephew, but this time a bit more grown-up and meeting his sister for the first time. The JBS Plastic Ribbon was the perfect finishing touch don't you think?


I used the same Plastic Ribbon on this card I made. It reminds me of the store-bought cards that often include a badge or award stuck up in the corner like this. I had so much Elle's Studio goodness left over that I decorated the inside of the card too!


Watch out for even more JBS and Elle's Studio projects to appear on the blog over the next few days. And don't forget to check out the Elle's Studio blog for even more inspiration from their amazing Design Team.

Happy Scrapping!
Photobucket
Pin It!

Tuesday, April 16, 2013

Scrapbooking with Washi Tape- The Golidlocks Technique


I am delighted that Jenni has added washi tape to her line of scrapbooking products, and of course her tapes are patterned with classic designs that will mix and match with ease.  I wouldn't expect anything less!  But this is extra brilliant considering a roll of washi tape - even used frequently - can last a long while.  All of the JBS tapes are great designs for that long-term use, and you'll never have to worry that they will go out of style.


If you're starting to collect washi more than you use it, try a trick for letting it help you embellish a page design.  Pick two tapes that work together for your page, and use three strips of each: one long, one short, and one in between.  Perhaps we should call this the Goldilocks Washi Technique!


Placing these three pairs of tapes on your layout then makes it easy to embellish things for a design that will always work.  I used the blue grid and whitewashed woodgrain tapes, and my smallest set is up at the top right corner, the longest across the middle of the page, and the middle set at the bottom.  Then it's just a case of choosing some embellishments you can repeat in those three locations, so I used a heart punch with the lovely blueprint paper from the Wren collection and a red doily.  Placing those three groups of embellishments and my photo first made it easy to finish the rest of the page because the placement was obvious: all that space to the left of the photo!  So that became a great place for journaling and some tags.  Of course, for a multi-photo page, you could easily replace some of the tags with additional pictures.  By keeping the three sets of tapes all on the horizontal and using them to anchor those repeated embellishments, the rest of the page comes together without worry.  Give it a try!


If you fancy more inspiration for your JBS washi tapes (and more red, white, and blue JBS goodness!), I have another project to share with you on my blog.  You can find this project here, designed as the facing page in my album.  These two pages aren't a double page spread in the strictest sense, but they have enough in common to certainly coordinate side by side.  


Pin It!

Sunday, March 24, 2013

The Princess and the Dragon

It's Natalie here, I want to tell you all about my most favourite JBS punch and maybe share a little technique too ;-)


I've put this punch to good use here on this layout. Can you spot it? Here's a close up...


You guessed it... It's the JBS Classic Bird Shape! But I've used it in a slightly different way to what you might imagine. Instead of punching out the birds to use as embellishments (although that's a perfectly reasonable method too!) I've punched out a row of the birds into a strip of cardstock and then I've used this as a home-made stencil.


I laid the stencil where I wanted it and then spread a think layer of Liquitex Modelling Paste over the top. While it was still wet I sprinkled it with some glitter knowing that the modelling paste would also act like glue. When I lifted the stencil off I was left with this lovely textural strip of sparkling birds.


Sticking with the bird theme I chose the "Letter From Bird-Land" paper from the Wren collection as my background. My layout tells the story (or fairytale really) of a Princess Birthday Party my 2 young girls went to recently. Little did they know their father was going to become the 'villian' of the party by dressing up as a Dragon and blowing fire at them as they passed by! Ahhhemmmmm..... yes you're right - those are fairy wings on his back.... but it was the closest we had to a dragon costume ;-)


Since I've started working some 8.5 x 11" layouts into my repetoir I've decided to turn all those off-cuts into a card.  The card and paper was already cut to the right size, I just simply folded it in half. And because I had all my supplies out I didn't even need to make any new design decisions!


What an easy-peasy way to add some cards into my dwindling stash! I even ended up using those punched out Classic Bird Shapes from creating my stencil. Nothing goes to waste in my house ;-)

Hope you enjoy what's left of your weekend. 
xxx

Pin It!

Sunday, March 17, 2013

Rockin' the Quilt Star Punch


I made this page using Jenni's new Quilt Star Punch which I used like a border punch. The punch is 1.5" wide so it's a great size. I used the new JBS Modern Mercantile line designed by Lisa Dickinson as well as a piece of blue paper from Wren. The light blue dot was an exclusive from the February Mercantile Main Kit. When I got these papers out, I knew I had the most perfect picture to use with them - a photo of my son standing in front of the stained glass window at church on Easter Sunday last year. Modern Mercantile is perfect for all kinds spring and summer stuff! It reminds me of green grass, sunshine, and blue skies.

This page is going in my Project Life album as the intro to the Easter Project Life pages I made using the February Mercantile kit.


Look how well these papers go together. From Wren I've used Blueprint. From Modern Mercantile I used: Hodge Podge, Patchwork, and Miscellany. After I had glued down the border strips I sewed over each of them with coordinating colored thread. I used white along the top of each row and then went back with the matching color down the center of the star row. When I used the white, I pulled extra thread out when I rotated the page without trimming it and beginning a new row so that when I went back with the colored thread it trapped strands of white thread. I love the way that ended up - kinda messy with a bit of added texture.

To ground the picture I cut banner tails in a strip from Fancy Checks and layered a printed tag, Vintage Flag, behind the photo.


Here's an example of how I made the quilt star border using cardstock. I grabbed these sheets from my scrap pile and took the punch and punched right along the edge of the paper. Don't worry about getting the spacing just right - once you get all those layers going it doesn't look like they're supposed to be perfectly aligned, in this case anyway, and it ends up looking rather charming with the imperfections. Then you simply lay one sheet on top of the next and glue them down.


To finish off the top of the page I punched the quilt star along an extra piece of the white dotted cardstock background to create a white on white border along the top. I trimmed and tucked the happy sticker under the white punched border. The dark yellow alpha stickers (Shadow Alpha Stickers) look so good with Modern Mercantile. 


Happy St. Patrick's Day and happy crafting!


Pin It!

Monday, January 14, 2013

Seal Cuts with Corrie

The digital cut files from the JBS Mercantile and Jessica Sprague are so much fun.  We have been showing you projects all month long using our favorite die cut files.  It is amazing what these machines can do!  I will be honest with you.  The first time I tried to use one of these, I had no idea what I was doing!  Thankfully it was pretty easy to learn, with a little help.  (Thanks Betsy!)


One of my favorites is the seal stencil.  I loved it as a stencil in the kit as well, but as a cut file it was even better because I could make it as large or small as I wanted.  For this page I wanted the cuts to take up an entire page.


I cut the large shapes out of kraft cardstock.  Then I layered different papers and a photo behind the different spaces.  I found the mini patterned sheets of paper were perfect with their scaled down patterns.


Then I added fun Jenni Bowlin embellishments like the rhinestone stars, the printed tags, and butterflies.


The vellum feathers are a must.


And a little journaling typed out on paper and the banner stickers.

I love the grid look without being square.  The seals really add a little more interest to a basic design, plus they are so much fun to customize on a layout.

Keep checking back all month long to see all the other amazing designs.
Pin It!

Wednesday, December 12, 2012

Christmas gifts and more~

Hi everyone~Connie here with some quick and easy gift ideas.  These do not take much time to make at all~so the good news, you still have time to craft!!!!

 
I used the super cute Silhouette mini deck of cards, to hold my lapel pin.  It is put together using the doily flowers {one of my faves}, old buttons, {JBS buttons} and a lapel pin set.


This is how the back looks!  I hot glued most of it!!! The next project~
 
 
I bought these adding machine key pieces from Jenni when I met her in Austin.  All I did was use a JBS button and hot glued a tack to the back of it~ like this.
The packaging is a re-purposed container that I covered with JBS Christmas 2012 paper, and tied it up with twine and super cute!!  I'm thinkin' I'm gonna put my name on this one:):):)
Next up~


I used the Silhouette mini deck and the tag paper and made some gift tags or they look pretty cute on the tree!!  I added some trim and the JBS chipboard buttons also.
 
 
This one is for all you junkers' out there like me~old door knob {I added inka-gold to the knob to make it shine}, wire~ heavy is all I can tell you, ribbon and JBS stickers, button and Christmas chipboard button.  Once the wire is twisted and put through the JBS button holes, hot glue it in the center hole of the door knob. 
 
 
The last project took the longest, but you still have time:):):) really, not that long!!!!
 
 
On these Christmas trees you need the Tim Holtz rosette dies or snowflake die and some cool JBS paper.  I used Wren for these!!  The embellishments are all JBS!!!  I have enjoyed sharing these holiday projects with you and wish you and yours a very merry happy holiday!!
by~C. Mercer
 

Pin It!